Monday, 3 December 2018

3 DIY Emergency Heaters That Will Keep You Warm This Winter

3 DIY Emergency Heaters That Will Keep You Warm This Winter is republished from http://totalsurvival.net

3 DIY Emergency Heaters That Will Keep You Warm This Winter Follow Me on Pinterest

3 DIY Emergency Heaters That Will Keep You Warm This Winter Follow Me on Pinterest

Whether It’s a Small Shed, a Garage, or Your Whole House, These Do-It-Yourself Heaters Really Deliver – But Be Careful.

Winter is here, and in spite of your best efforts, there’s always that one room that is too cold. Electric space heaters are the usual option, but they have some downsides. For one, they really burn up the watts. Most space heaters run at 1500 watts on their high setting, and our electric bills tell the tale.

They’re also dependent on electricity. That can mean running extension cords to an out-building like a shed or detached garage, assuming it’s a reasonable distance from a power source.

There’s also the possibility of a power outage–which could last anywhere from a few hours to a few weeks–and that’s when alternative heat sources are no longer just convenient, but absolutely critical.

Want to save this post for later? Click Here to Pin It on Pinterest!

Many people depend on wood-burning stoves or pellet stoves to keep up the heat, but most of these heat sources are centralized to living areas rather than out-buildings. There are ways to distribute wood or pellet-fired heat to other areas in a house, but some spaces in a home just don’t seem to get enough.

Fortunately, there are some easy-to-make alternatives that can allow you to keep any space warm. These DIY heaters are simple and can often be assembled from materials you already have on hand.

They tend to be most effective in smaller spaces, but a lot has to do with temperatures that are tolerable rather than toasty. Even the smallest DIY heater can maintain a relatively comfortable temperature of 50° Fahrenheit. That’s sweater weather and it beats freezing.

In larger spaces, you may need a few of these improvised heaters. Just remember, the more open flames you spread around in any space, the greater the risk.

We’re going to explore three DIY heaters, but before we get into the materials and assembly details, we should cover a few points on fuels, fumes, safetyand heat exchange.

Fuels

Two primary fuels are used for the heaters we’re going to cover. Candles and a 70% solution of Isopropyl alcohol. A third possibility is a gasoline additive known as HEET, but it can produce an odor if the heater is not burning properly and is more flammable than a 70% solution of isopropyl alcohol.

Candles

Tea Candles Follow Me on Pinterest

Tea Candles Follow Me on Pinterest

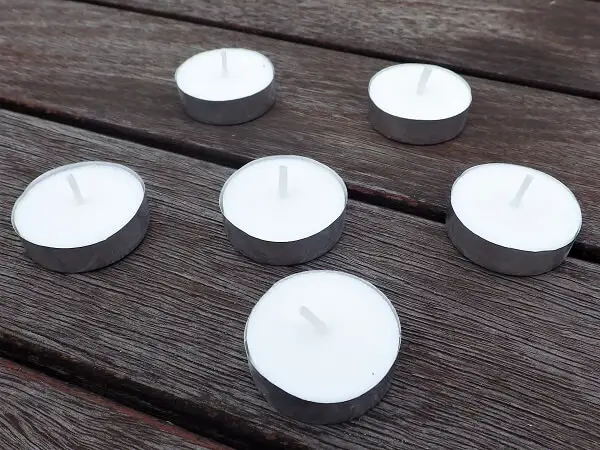
The candles should be made with unscented, undyed wax. The smell of vanilla might be pleasant for an hour or so but can become a bit overwhelming as the hours wear on. We’re going to use plain white tea candles because they burn for 4 to 5 hours. The small metal cups surrounding the candle at the base also add a safety factor.

Isopropyl Alcohol

70% Isopropyl Alcohol Bottle Follow Me on Pinterest

70% Isopropyl Alcohol Bottle Follow Me on Pinterest

Isopropyl alcohol can be bought in most any pharmacy and many hardware stores. The proof varies across basic concentrations ranging from 50% to 91%. A 70% solution is ideal because it burns clean and will keep a steady, hot flame. Goldilocks will be the first to tell you that 50% is too low while 91% is too high, but 70% is just right.

A wick is used to draw the alcohol to the flame and this wicking catalyst is usually fireproof insulation material or, believe it or not, toilet paper.

Fumes

Anything that burns gives off various gases. Smoke is the most noxious and usually the result of burning carbon-based fuels. Fortunately, isopropyl alcohol and candles give off little if any smoke and the fumes are relatively harmless.

The one caution has to do with the consumption of oxygen within an enclosed space. Any flame needs oxygen to burn, and a flame that starts to dim for no apparent reason is telling you something. It either needs more fuel or more oxygen.

It seems contrary to the idea of keeping the cold out, but some degree of ventilation is recommended even if all it means is opening the door now and again.

Safety

Open flames present obvious problems, so common-sense and due diligence are necessary here. It’s fair to say that many of us burn candles from time to time without harm, but the heaters we’re talking about will potentially be burning with an open flame for some length of time.

That’s why the location of your DIY heater is so important. It should be away from walls, drapes, beds, and any other flammable materials. It should also be in a location where it won’t be knocked over.

You should also develop a good insulating layer between the base of your heater and any surface, especially a wood surface. Temperatures in some of the spaces in these heaters will range from 200 to 400° Fahrenheit. Paper bursts into flame at 451° F, and 400° is getting close.

Typical insulating materials include brick, tile, or a layer of stones underneath the heater. A double layer of these materials beneath the heater is also wise as it will further disperse the heat.

Heat Exchange

One of the concepts that increases the heat for one of these DIY heaters is a simple heat exchanger. A furnace works on the same principle.

A large slab of metal or ceramic is heated and then air is forced over the hot material to cause a heat exchange. As you’ll see in one of our homemade heaters, we’ll be using terracotta flowerpots to exchange heat with the surrounding air.

A good example of basic heat exchange can be found on the iron tops of wood-stoves. They’re often decorated with cast-iron objects in various shapes to allow the heat from the iron firebox to transfer to the cast-iron decoration and to the surrounding air.

If you ever see an iron duck resting on top of a wood-burning stove, you’d be wise to avoid grabbing it. It’s very hot, and heat exchange is the reason why.

DIY Emergency Heaters

1. The Tin Can Heater

Tin Can Heater Follow Me on Pinterest

Tin Can Heater Follow Me on Pinterest

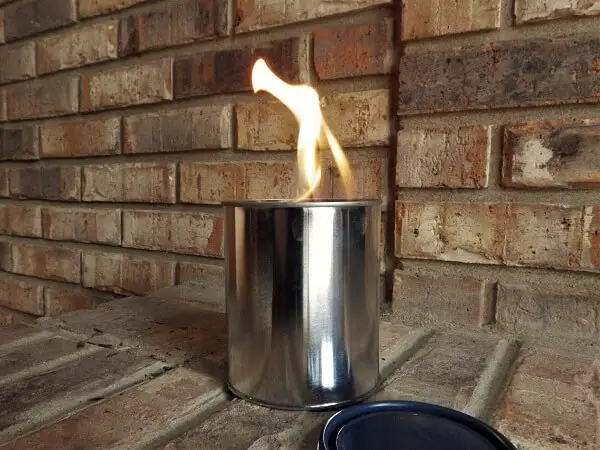
This DIY heater is simple to assemble, it’s easily and safely stored, and it kicks out a lot of heat. It produces a fairly large flame, so location is critical. It’s also a potential hazard if it’s knocked over. There is isopropyl alcohol in the can and any spill will burst into flame, so be careful with this one.

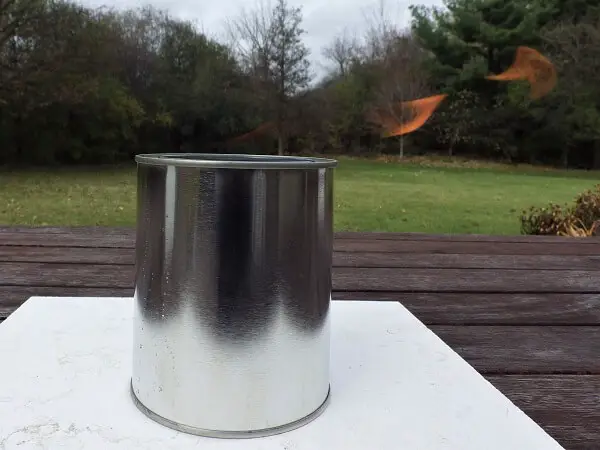
You’ll also find that an alcohol flame is difficult to see in daylight.

Tin Can Heater Almost Invisible Flame In Bright Light Follow Me on Pinterest

Tin Can Heater Almost Invisible Flame In Bright Light Follow Me on Pinterest

Make sure everyone knows what’s going on so they don’t accidentally touch or knock over the heater because they couldn’t see the flame.

The can is a 1-quart paint can and should be a new, empty can. You can buy them at most hardware stores for about $3. Don’t use a can that has any residual paint in it. The paint will give off toxic fumes while the heater is burning.

Splurge and spend the three bucks to get a clean, new can. A 1-quart can will burn a little over an hour until it needs to be refilled. Don’t refill the can until it has fully cooled.

Tin Can Heater With Tin Can Options Follow Me on Pinterest

Tin Can Heater With Tin Can Options Follow Me on Pinterest

An option is a metal soup can or another tin can. The can should be well rinsed, and the paper label and the line of glue removed as well. From there, the principle is the same as the paint can except you won’t have a tight sealing lid for extinguishing, storage, and future use.

Materials and Tools:

Tin Can Heater Materials And Tools Follow Me on Pinterest

Tin Can Heater Materials And Tools Follow Me on Pinterest
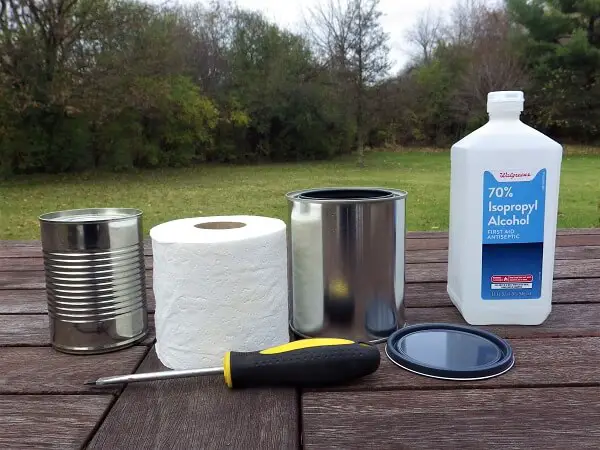
  • 1 empty 1-quart paint can with lid or empty food can
  • 1 roll of toilet paper
  • 1 bottle of 70% isopropyl alcohol
  • A flathead screwdriver

Assembly:

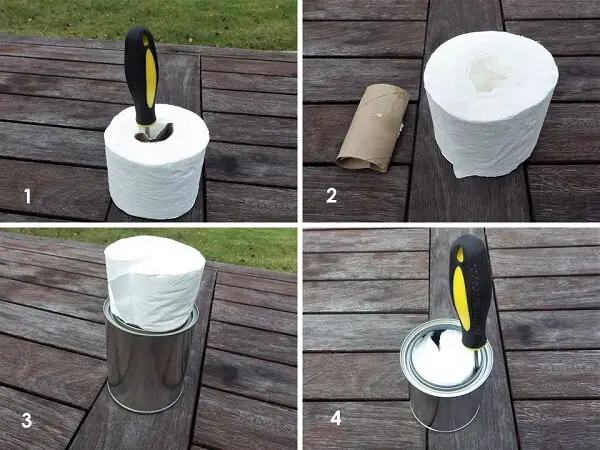
Tin Can Heater Assembly Process Follow Me on Pinterest

Tin Can Heater Assembly Process Follow Me on Pinterest
  1. Use a screwdriver and your hands to remove the cardboard tube from the center of the toilet paper roll.
  2. Once the tube is removed, squeeze the roll so it collapses in on itself.
  3. Slowly insert the toilet paper roll into the can.
  4. As you approach the end of the roll, you might need the screwdriver to get it past the rim.

Tin Can Heater Setup Process Follow Me on Pinterest

Tin Can Heater Setup Process Follow Me on Pinterest
  1. Make sure the toilet paper is below the rim of the can.
  2. A large tile at least 1-foot square should be placed under the can.
  3. Slowly pour the isopropyl alcohol onto the toilet paper wick until it is saturated.
  4. Light the top of the can,f but be careful if you place the can in a bright area. The flame can be difficult to see.

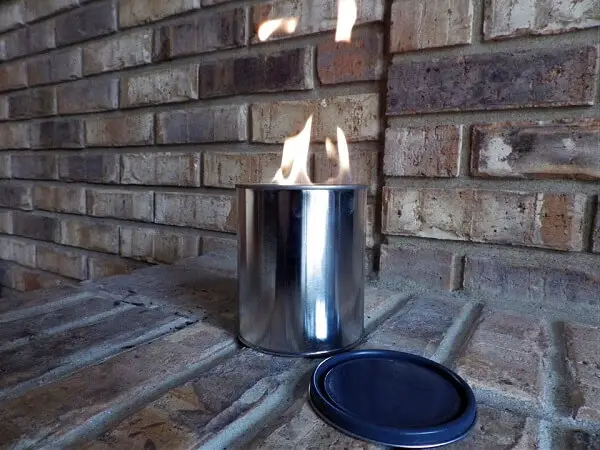
Tin Can Heater Lit Follow Me on Pinterest

Tin Can Heater Lit Follow Me on Pinterest

Place the can in a safe location. The can will get very hot, so extinguish it and let it cool before touching. The lid can be slipped over the top to put out the flame. Seal the lid with light taps from a hammer and store where you store other flammable materials like kerosene, gas, oil, and propane. Before using again, top off the can with more isopropyl alcohol.

It may surprise you, but the toilet paper will not burn. It acts like a wick drawing alcohol from the bottom of the can. However, if too much alcohol burns off, the toilet paper could begin to char. When the alcohol level gets low, extinguish the flame, let the can cool completely, and refill to the proper level.

2. The Flower Pot Tea Candle Heater

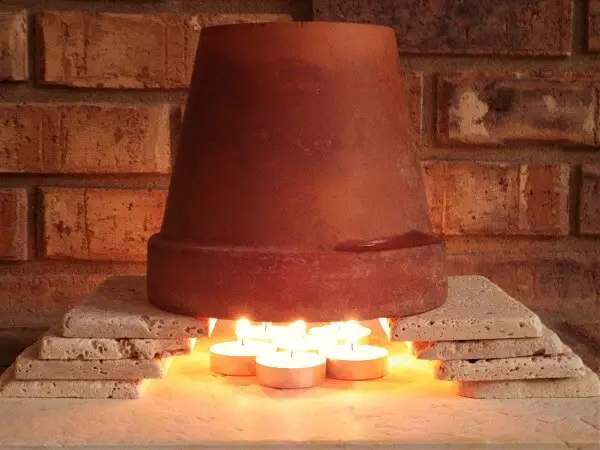
Flower Pot Tea Candle Heater Follow Me on Pinterest

Flower Pot Tea Candle Heater Follow Me on Pinterest

It seems absurd to think that one tea candle could produce enough heat to heat a room, and you’re right. It takes 4 to 6 tea candles to do the job. What makes this tea candle heater work is the heat exchange concept. Terracotta flowerpots fulfill the role of heat exchanger, and over 20 to 30 minutes, they will get significantly hot from the small flames of a few tea candles.

This is another DIY heater that needs to be located carefully. The good news is that if it’s knocked over it won’t spread flaming alcohol, but melted wax is highly flammable and open flames are open flames.

Materials:

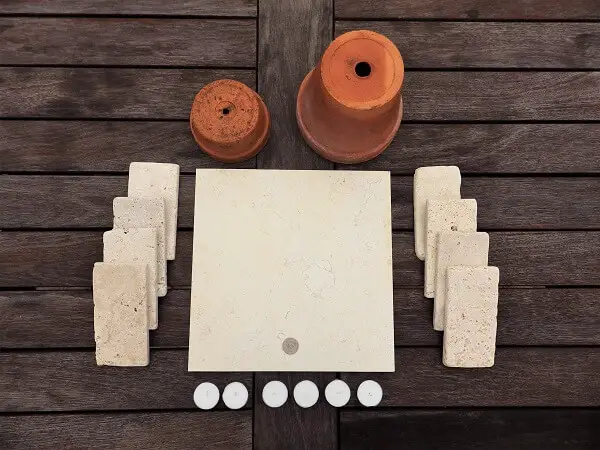
Flower Pot Tea Candle Heater Materials Follow Me on Pinterest

Flower Pot Tea Candle Heater Materials Follow Me on Pinterest
  • 1 4-inch diameter terracotta pot
  • 1 6-inch diameter terracotta pot
  • 4 to 6 plain white tea candles
  • A large tile to isolate the heat from any surface and support the candles
  • Smaller tiles or bricks to support the flower pots
  • A quarter to seal the drain hole in the smaller pot when inverted

Assembly:

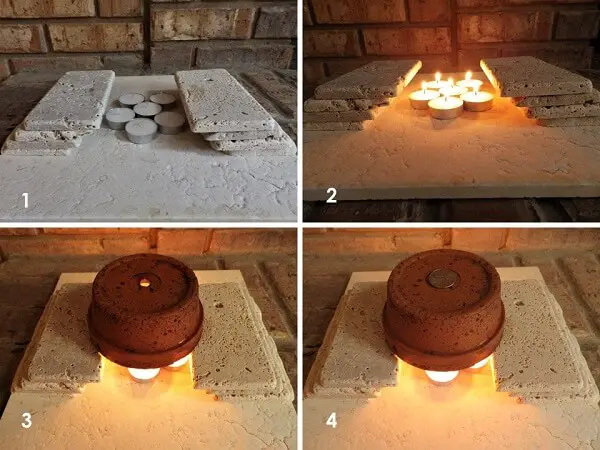
Flower Pot Tea Candle Setup Follow Me on Pinterest

Flower Pot Tea Candle Setup Follow Me on Pinterest
  1. Build up the smaller tiles on the large tile so they can support both flower pots and create enough air-space to keep the candles burning under an inverted pot.
  2. Center the candles and light.
  3. Invert the smallest pot so it is over the candles.
  4. Cover the hole in the bottom of the smallest pot with the quarter. Do not do this with the second, larger pot.

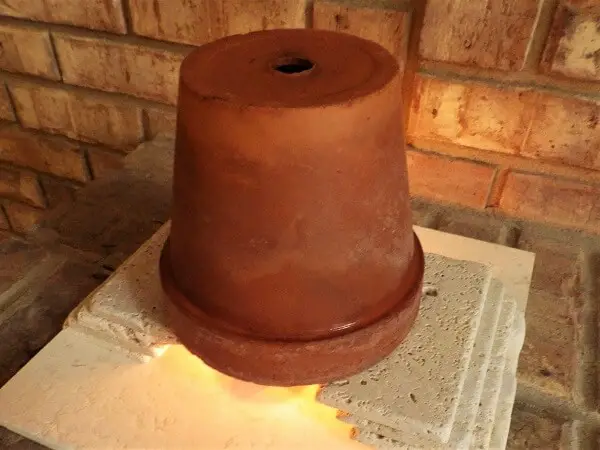
Flower Pot Tea Candle Heater Top Pot In Place Follow Me on Pinterest

Flower Pot Tea Candle Heater Top Pot In Place Follow Me on Pinterest
  1. Invert the larger pot over the smaller pot.

In 20 to 30 minutes you will begin to feel significant heat from the sides of the large pot and from the open hole at the top. To extinguish, blow out the candles, but be careful with the pots. Internal temperatures have been measured up to 400° Fahrenheit in the small, inner pot. Give them sufficient time to cool before handling.

There are backup alternatives to flower pots. Maybe the best is a cast-iron Dutch Oven inverted on the tiles or bricks in place of the flowerpots. You won’t have the convection that a flower pot within a flower pot creates, but the cast-iron will definitely get hot.

3. The Soda Can Jet Burner

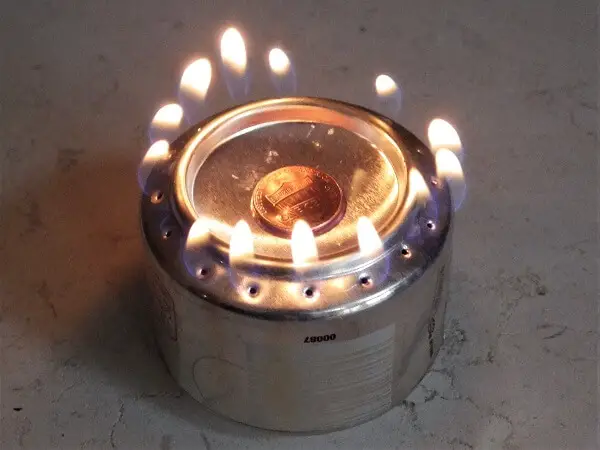
Soda Can Jet Burner Follow Me on Pinterest

Soda Can Jet Burner Follow Me on Pinterest

This heater is an alcohol burner on steroids. Due to its compact size, it can be used in place of tea candles in the Flower Pot heater. One of these heaters under a flower pot will do the trick, and two will double the heat. However, this heater will also give off heat on its own, so flower pots are optional.

The assembly is a little complicated compared to the other two heaters, but the materials are very easy to find around the house.

Materials and Tools:

Soda Can Jet Burner Materials And Tools Follow Me on Pinterest

Soda Can Jet Burner Materials And Tools Follow Me on Pinterest
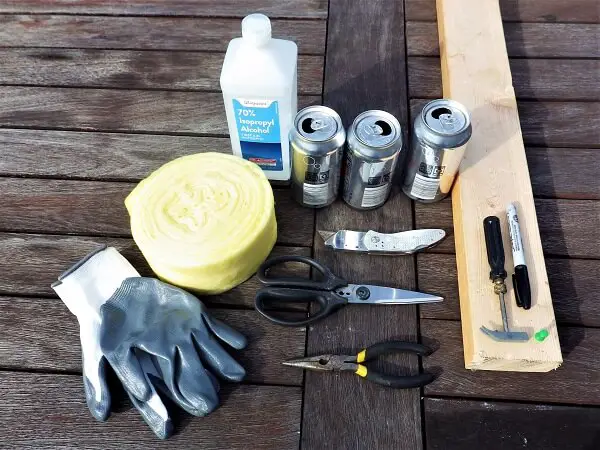
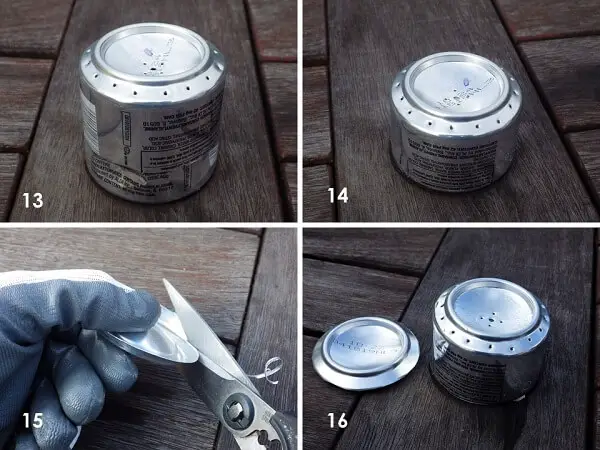
  • 3 empty and rinsed aluminum soda cans
  • A handful of fireproof insulation or pipe wrap insulation
  • 1 bottle of 70% isopropyl alcohol
  • A penny
  • Kitchen shears
  • A pushpin for punching the holes
  • A small hammer of anything that can be used to pound the pushpin through the thin aluminum
  • Work gloves to protect your hands from the sharp edges of the aluminum
  • Permanent marker
  • A small piece of a 2×4 to guide the marker on the can before cutting
  • Needle nose pliers

Assembly:

Soda Can Jet Burner Hole Punching Process Follow Me on Pinterest

Soda Can Jet Burner Hole Punching Process Follow Me on Pinterest
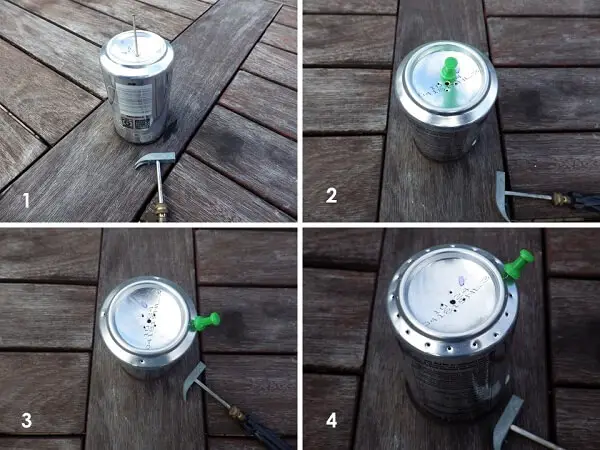
  1. Put the can down with the bottom up and using a nail, carefully drive the nail through the center of the bottom of the can.
  2. Using a pushpin, make 4 holes around the nail hole. Use the small hammer to help drive the pushpin into the aluminum.
  3. Use the same pushpin to make 16 evenly spaced holes around the ridge at the bottom of the can. To do this, start with one hole and go to the opposite side of the can for the second hole and continue in this way to create evenly spaced holes.
  4. Split the difference between the two holes and punch again. Keep splitting the difference until you have 16 evenly spaced holes.

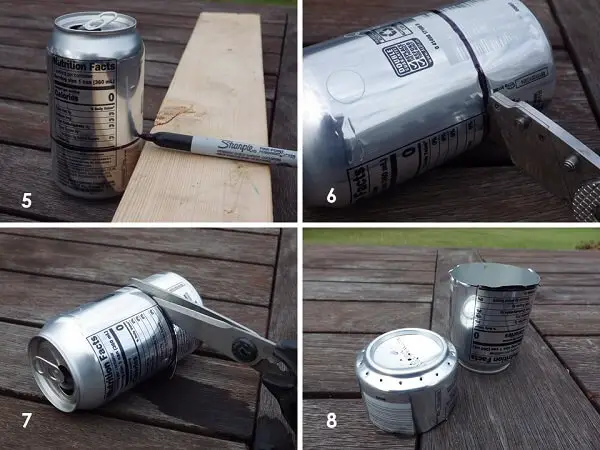
Soda Can Jet Burner Marking And Cutting The Cans Follow Me on Pinterest

Soda Can Jet Burner Marking And Cutting The Cans Follow Me on Pinterest
  1. After the holes are punched, rest the can against the 2×4 with the board lying flat. Hold the tip of the permanent market against the edge and slowly rotate the can to draw an even line around the circumference of the can. Repeat with the other can.
  2. Cut a starting cut on the can using a razor knife.
  3. Use the kitchen shears to cut the can along the line around the circumference.
  4. You now have the top burner section complete.

Soda Can Jet Burner Bottom Base Construction Follow Me on Pinterest

Soda Can Jet Burner Bottom Base Construction Follow Me on Pinterest
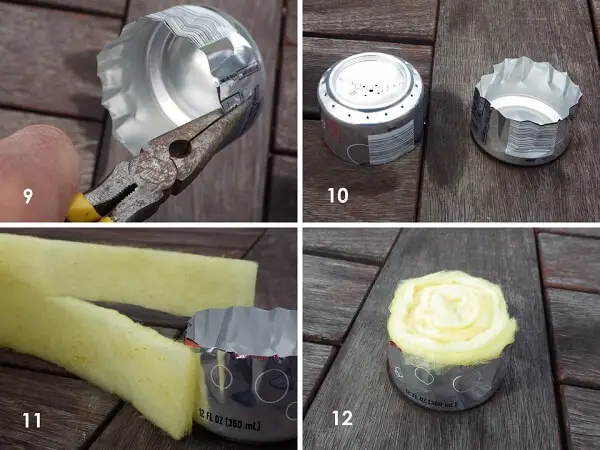
  1. Repeat with the other can and, using the needle nose pliers, twist and crimp the can every half-inch to make it easier to insert into the top portion of the burner.
  2. Once you have both cans’ bottoms cut and the top punched, you’re ready for the insulation wick.
  3. If using pipe wrap insulation (which is a cheap way to pick up some insulation), cut it the long way to the height of the base can.
  4. Roll the insulation and stuff into the base can.

Soda Can Jet Burner Final Assembly Follow Me on Pinterest

Soda Can Jet Burner Final Assembly Follow Me on Pinterest
  1. Carefully place the top can over the insulation filled base to fit together.
  2. Press the top down gently until the cans are tightly joined. Pour the 70% isopropyl alcohol into the top and allow to percolate into the can. You could also use a gasoline additive like HEET, but you’re probably better off with the alcohol. You’ll have to repeat this filling step numerous times. Lift the can from time to time to assess the amount of alcohol it’s holding.
  3. Using your kitchen shears, cut the bottom base off of the third can along the rim.
  4. This bottom rim can now be used to extinguish the flame.

Soda Can Jet Burner Lighting Process Follow Me on Pinterest

Soda Can Jet Burner Lighting Process Follow Me on Pinterest
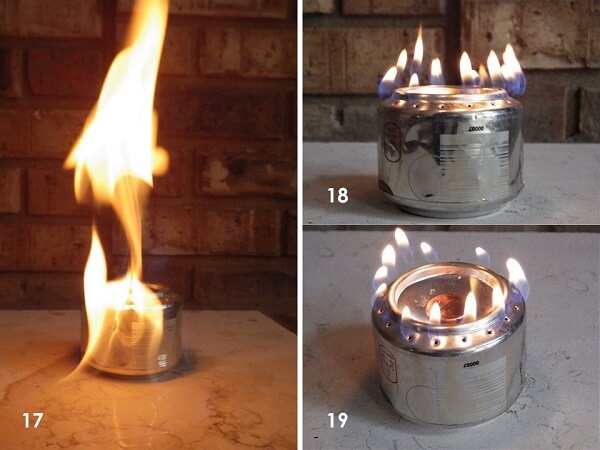
  1. To get the can kick-started, pour a little of the fuel around the base of the heater to raise the temperature of the metal and encourage rapid evaporation. Remember to have a slab of tile to protect any surfaces from the flames. Light the top of the heater and the fuel around the base. If necessary, repeat the lighting process a few times to get the burner started. Wait until any flames are out before adding any alcohol to the heater or the tile base. You should also be careful to watch for any phantom flames. Alcohol burns with a dim, blue flame and can be very hard to see.
  2. Once the can is starting to flame through the perimeter holes, let it burn for a few minutes. Some holes will not be lit but they should catch flame soon.
  3. When a good number of the rim, perimeter holes are flaming, toss the penny onto the can to seal the center holes. Center it in place with a screwdriver.

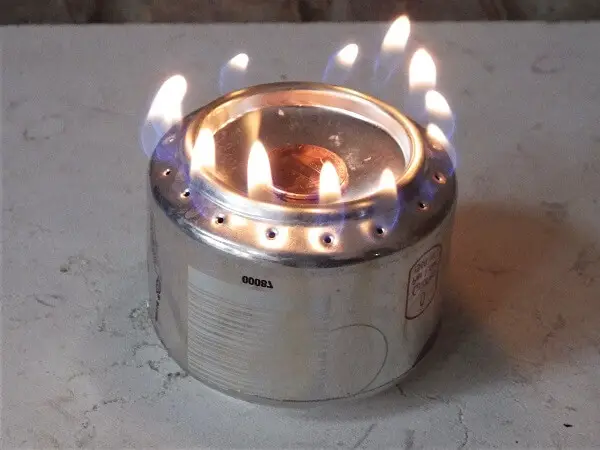
Soda Can Jet Burner At Peak With Penny Follow Me on Pinterest

Soda Can Jet Burner At Peak With Penny Follow Me on Pinterest

The heat from this tin can heater can not only be used to heat a space but to cook with a setup that will support a pot or pan. It also works very well with the terracotta flowerpot setup.

Points to Ponder

These DIY heaters work, but they can be dangerous. Here are some tips for managing an open flame.

Location

  • The floor is a really bad place for an open-flame heater. It can be easily knocked over by a careless step, an over-anxious pet, or someone knocking something over and into it.
  • Think about how you currently manage open flames in your home.
  • Most people understand the importance of a fireplace screen in front of an open fire.
  • Gas ranges isolate the blue flame at waist height in an environment typically surrounded by metal.
  • Candles usually occupy the center of a table or in sconces on the wall.
  • Even space heaters are usually set up away from walls or furniture and really shouldn’t be placed on a rug.

Ventilation

  • Be mindful of ventilation. Open flames burn up oxygen rapidly. However, many of us cook over gas range tops with no apparent effect, but if your paint can heater is burning for a long duration it might be time to think about opening a door or window.
  • Don’t go to sleep with one of these open-flame heaters blazing away. Anything can happen, although the tea candle and flowerpot setup may be the most benign if properly placed and insulated from any surface.

If you’re planning to use these heaters on a regular basis, you might want to think about stockpiling things like cans, isopropyl alcohol, tea candles, terracotta flowerpots, and a piece of fireproof insulation.

Hopefully, you’ll only use them for a short-term trip to the shed or the garage in winter, but if they become your only source of heat, you’ll want to be ready.

Like this post? Don’t forget to Pin It on Pinterest!

This article first appeared on urbansurvivalsite.com See it here

This Article Was Found Here: 3 DIY Emergency Heaters That Will Keep You Warm This Winter

Sunday, 2 December 2018

Lotion Bar Recipe – Easy to Make with Just 3 Ingredients!

The following article Lotion Bar Recipe – Easy to Make with Just 3 Ingredients! is courtesy of Total Survival

Most homemade lotion recipes involve quite a few ingredients, blenders and more mess than I'd prefer to clean up. In contrast, all you need for these hard lotion bars is three ingredients, one pot, and molds – that's it! You can even use muffin tins if you don't have other molds, since the bars use […]

The post Lotion Bar Recipe – Easy to Make with Just 3 Ingredients! appeared first on Common Sense Home.

This Article Was Originally Posted at commonsensehome.com Read The Original Article Here

Post Source Here: Lotion Bar Recipe – Easy to Make with Just 3 Ingredients!

Saturday, 1 December 2018

Gardening Gifts They’ll Love – Practical, Beautiful and Unique

The article Gardening Gifts They’ll Love – Practical, Beautiful and Unique was originally seen on http://totalsurvival.net

Many of the gardening gifts I've seen in other guides aren't a great fit for me, so I decided to put together a list who like some functional mixed in with their fun. I don't know about you, but I enjoy gifts that I use on a daily basis, since each time I use them it […]

The post Gardening Gifts They’ll Love – Practical, Beautiful and Unique appeared first on Common Sense Home.

This Article Was Originally Posted at commonsensehome.com Read The Original Article Here

Source Here: Gardening Gifts They’ll Love – Practical, Beautiful and Unique

Hunting 101: Tracking And Finding Animals In The Snow

Hunting 101: Tracking And Finding Animals In The Snow was originally published on http://www.totalsurvival.net/

Tracking

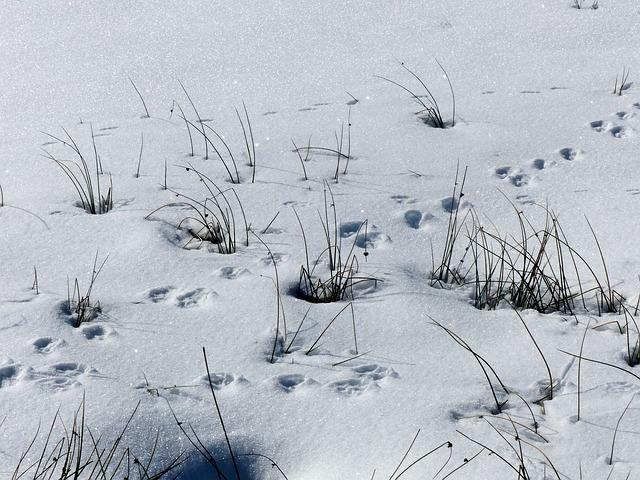
For those of us who live in the North, winter snows bring an unexpected benefit: It is much easier to find and follow animal tracks. If you are a novice tracker, or if you would like an opportunity to deepen your skills, winter is an excellent time. It is possible to find very clear tracks and trails, distinguish regular runs, and even detect how recently an animal traveled by, as determined by the snowfall.

The best tracks are found after a new snowfall, early in the morning as the sun is rising. If you are in a populated area, dogs and people will spoil most trails quite soon after sunrise. In the country, tracks can remain pristine all winter if conditions permit it. You will have to take note of how recently snow and other precipitation falls and learn to read the snow, in order to determine the age of a track. For example: Imagine your region has a powdery snowfall, and then an ice storm, and then a powdery snowfall again. Fresh tracks would be in powdery snow on top of ice. Any frozen tracks would be older than the storm, and probably useless except as a curiosity. Keeping a log of the weather is useful for trackers.

Tracking

Tracking

Tracking For Beginners

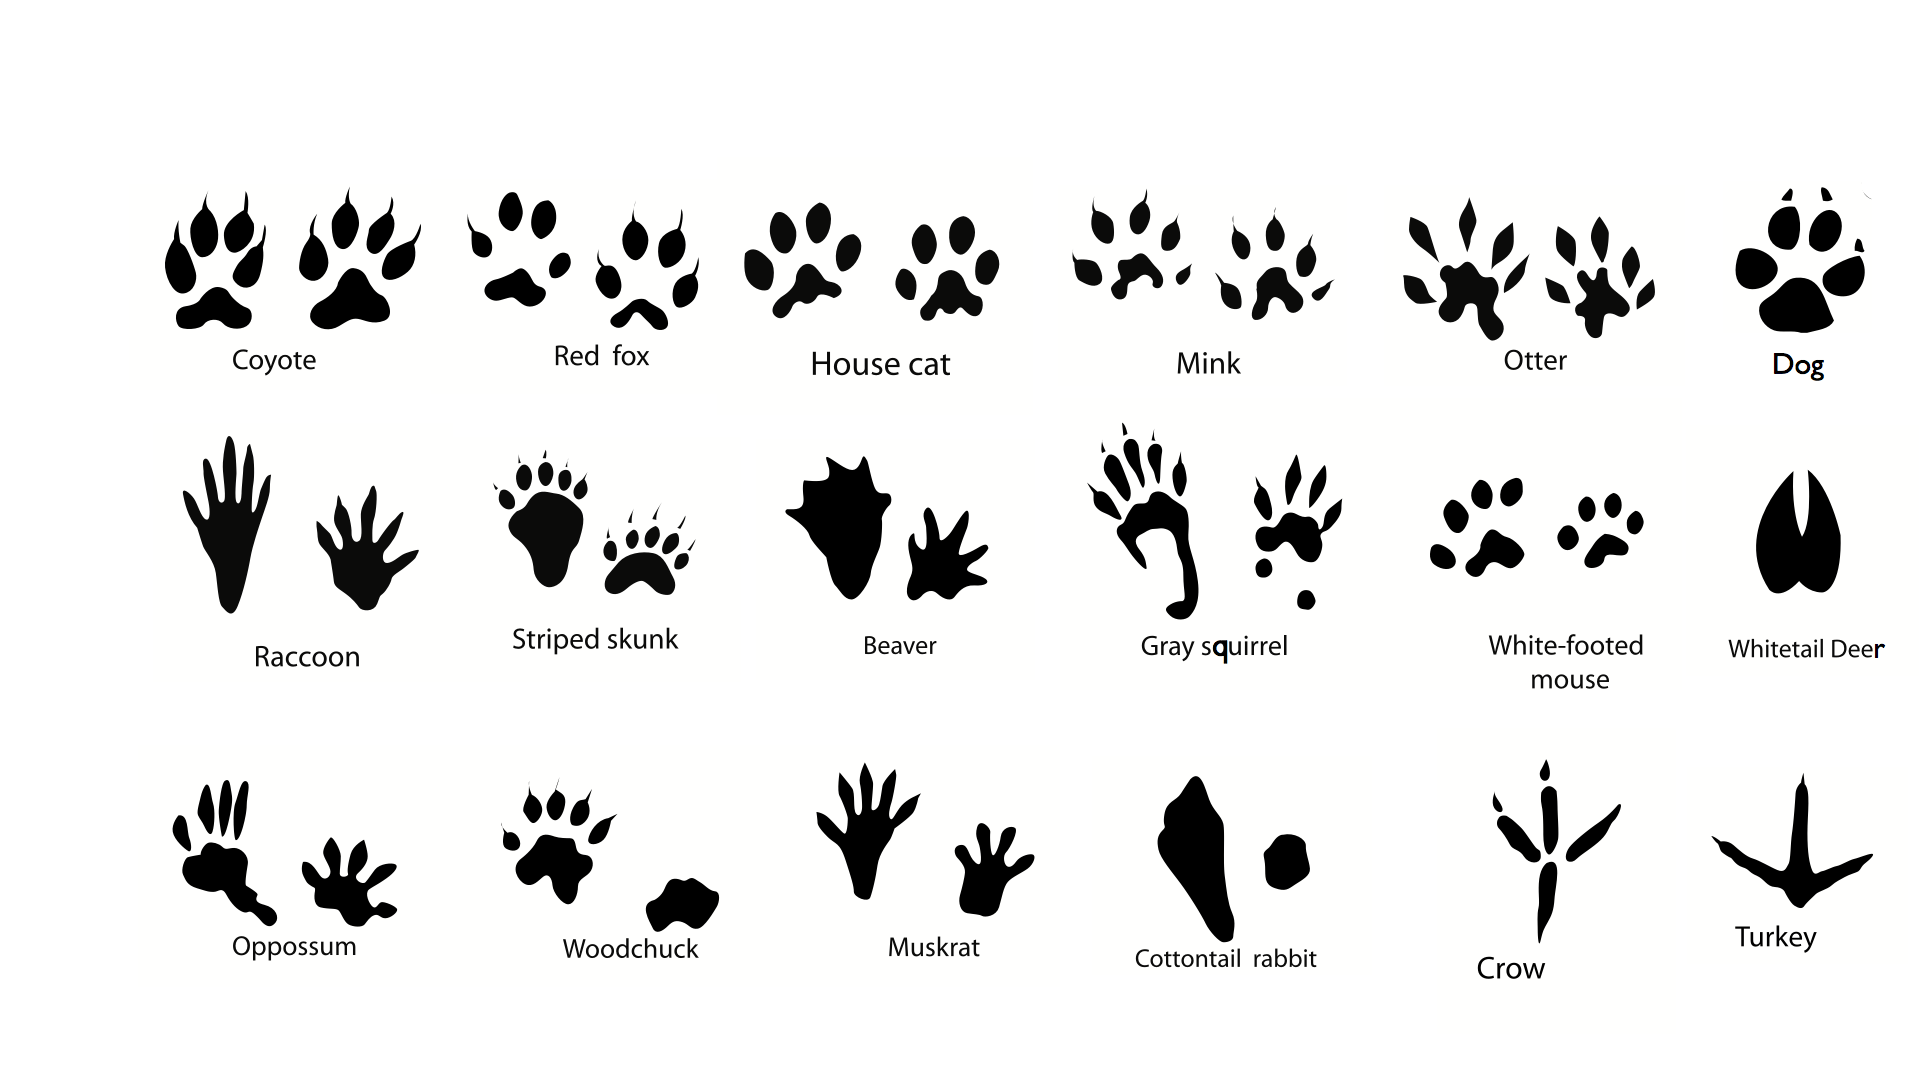
If you are an absolute beginner, you must first learn which animals make which tracks. Even near your homestead you should see patterns of prints leading in various directions. You may notice animals near tracks, as well. Keep a logbook of tracks, sketching them and noting which animals were nearby, the conditions, and if you could find a trail. You also can purchase a guidebook picturing local animals and their tracks, but you will still need to learn to recognize them in the wild; tracks look differently in snow and mud than on paper.

A hike in the snowy woods should yield many examples of tracks. This, in itself, is excellent fun, and no opportunity to look for prints in the woods should be wasted. Challenge yourself and your family to identify as many of the local animals by track alone as possible. However, identifying animals is only part of tracking; you need more information before you’ll catch anything. After you find an animal track, you must also locate its trail and establish the age of the trail.

Safety First

Tracking

Tracking

In winter, there are many clues offered by following an animal’s trail. In this case, you will be leaving established walking paths and moving into the woods, so exercise caution. It is very easy to become disoriented when you are following tracks. Begin in country in which you are familiar and know the surrounding topography, and travel with at least a basic understanding of orienteering. Never venture into the winter wilderness without proper survival gear. Don’t track bears, wolves, moose, cougars or other large animals without proper training and a firearm. Knowledge of weather won’t hurt, either; suffice it to say it’s better to watch the storm hit from indoors.

Successful Tracking

On a fair winter day after snowfall, find a clear track on your normal route, identify it, and begin to follow in its direction of travel. Don’t walk on the tracks, but nearby, marking them in the snow or with blazes on nearby trees. If you plan to hunt, it is valuable to know the behavior of your intended catch. Many animals will travel similar routes, seeking food and especially water. If you find one of these routes, called a run, you likely will be able to find the animal. In the case of small game, you could set traps along a run to catch animals for food; with larger game, you would likely set up a blind for hunting nearby. The real objective of tracking is determining where the animal is, or will be, not where they were.

The End Of The Trail

Another destination that trails may take you is a den or cover. You will know you have found an animal’s home when you see many tracks leading into it — food scraps, droppings, or the den itself. Try not to despoil the area; you don’t want to make your presence felt. It is better to know more about the animal’s whereabouts than it knows about yours. If you find an animal’s home, you can watch the area to find a good location for hunting. Consider hunting a distance away from a den or cover; other animals may use it, and if you hunt there you may drive them away, but if you hunt nearby you may catch more.

With practice and regular travel into the winter woods, you will be able to identify tracks and know the patterns of your animal neighbors – a skill that could prove invaluable one day.

What advice would you add on tracking animals? Share your advice in the section below:

Learn How To ‘Live Off The Land’ With Just Your Gun. Read More Here.

The post Hunting 101: Tracking And Finding Animals In The Snow appeared first on Off The Grid News.

This Article Was Originally Posted On offthegridnews.com Read the Original Article here

See Full Article Here: Hunting 101: Tracking And Finding Animals In The Snow

Friday, 30 November 2018

Did The Pilgrims Really Come To America To Worship As They Pleased?

Did The Pilgrims Really Come To America To Worship As They Pleased? is courtesy of http://totalsurvival.net

“The conscious or unconscious relationship to God in

a man’s heart determines both man’s cultus and his culture.”

—Henry Van Til

What’s a Pilgrim?

Pilgrims

The Pilgrim Fathers, like Thanksgiving itself, are quickly slipping down the collective memory hole of American materialism and self-indulgence. We no longer care that such a people lived, nor do we have any real conception of why they came to North America. Those who know something of the Pilgrims may speak vaguely of liberty or religious freedom. Many adult and children’s books say the Pilgrims came here “to worship God the way they pleased.” But this is a very big error — and a very serious one.

True Worship

The Second Commandment forbids us to recreate God after our imagination (Ex. 20:4-6). So that means … it also forbids us to imagine what might be pleasing to God. God represents Himself truly in His written Word. This written revelation tells us clearly and accurately how we ought to think about God and how we ought to worship Him. Real faith lies in submission to God’s Word … in worshipping and living in obedience to what God has said. All other sorts of worship are what Scripture calls “self-made religion” (Col. 2:23) and “the way of Cain” (Jude 11; cf. Gen. 4).

Now, the Pilgrims understood all of this. They had no desire to worship God as they pleased or as any other man … pope, prelate or king … pleased. They wanted to worship God according to His own self-revelation in Scripture. Their hearts were captive to the Word of God. They searched and studied the Bible to see what God had actually said about the matter, and they rejected all that seemed to them to be merely human tradition.

The Pilgrim’s flight to the New World was powered by this mindset. They fled an Old World of religious oppression and sought out a New World where they could obey Scripture in all matters of worship and life. And, yes, they hoped to be a steppingstone for other evangelical Christians who might follow. And yes, they hoped to play a role in evangelizing the native inhabitants of North America. But the one thing they didn’t want was to lay the foundations of a nation where everyone could worship God however he might please.

The Mayflower Compact

The Pilgrims themselves set out in writing their purposes in coming to North America. They drafted and signed a covenant document that created a civil commonwealth. That document is called The Mayflower Compact.

In the name of God, Amen. We, whose names are underwritten, the loyal subjects of our dread Sovereign Lord King James, by the Grace of God, of Great Britain, France, and Ireland, King, defender of the Faith, etc.

Pilgrims

Pilgrims

Having undertaken, for the Glory of God, and advancements of the Christian faith and honor of our King and Country, a voyage to plant the first colony in the Northern parts of Virginia, do by these presents, solemnly and mutually, in the presence of God, and one another, covenant and combine ourselves together into a civil body politic; for our better ordering, and preservation and furtherance of the ends aforesaid; and by virtue hereof to enact, constitute, and frame, such just and equal laws, ordinances, acts, constitutions, and offices, from time to time, as shall be thought most meet and convenient for the general good of the colony; unto which we promise all due submission and obedience.

In witness whereof we have hereunto subscribed our names at Cape Cod the 11th of November, in the year of the reign of our Sovereign Lord King James, of England, France, and Ireland, the eighteenth, and of Scotland the fifty-fourth, 1620.

The Pilgrim Fathers spoke plainly of the “glory of God” and the “advancements of the Christian faith.” Any laws, ordinances, acts or constitutions they or their descendants might later enact or create were to be for the furtherance of these ends. In short, the Pilgrims saw their colony as an outpost of the Kingdom of God and the Church of Jesus Christ. The liberty they sought and established was the freedom to obey God in all things, beginning with worship. It wasn’t a liberty for idolatry and “will worship” (Col. 2:23).

Freedom from Religion?

Today, America is schizophrenic on the matter of worship. We say that every man ought to be free to worship as he pleases. Most Americans believe that no one, (not even God), should offer a word of rebuke or correction in such matters. On the other hand, we insist that no one ought to carry his beliefs about worship out of his prayer closet or church into the public square. After all, liberty has its limits. Freedom of worship must remain a strictly private affair lest we offend someone or their pets.

Islam is the odd exception to this paradigm. Muslims, we are told, have the right to carry their worship into the public square, into schools, and even into the legal system. We are also told their religion is kind and peaceful and that it would be unloving, impolite and impolitic to say otherwise. Christians, especially those who stand in the tradition of the Pilgrims, are allowed no such “freedom.” Schizophrenia dial set at 11.

The Nature of Worship

Worship belongs at the center of human life because it’s here that humans meet their Maker. Christian worship is a matter of the heart, not of mere externals. But for this very reason, then … worship becomes the inevitably fountain of all law, social interaction and culture. For out of the heart are the issues of life; as a man thinks in his heart, so is he (Prov. 4:23; 23:7). Culture is our collective worship of God … externalized.

Godly worship promotes justice, mercy, love and peace within a society. Ungodly worship promotes hatred, bitterness, violence and war. The choice here seems easy enough. And yet true worship isn’t something that arises naturally in the human heart, nor is it something that one person can force on another. True worship, godly worship, can only arise from a heart renewed by the Holy Spirit through the Gospel. God seeks true worshipers through evangelism, the preaching of the Kingdom of God, and not through swords, guns or setting your city on fire.

But those freed by the Gospel will fight to maintain their freedom to worship God as His Word commands. They will lawfully and peacefully oppose those who try to destroy that freedom. They will speak the Gospel boldly, even if it leads to chains, torture, and death. That’s what the Pilgrims did.

The post Did The Pilgrims Really Come To America To Worship As They Pleased? appeared first on Off The Grid News.

This Article Was Originally Posted On offthegridnews.com Read the Original Article here

Post Source Here: Did The Pilgrims Really Come To America To Worship As They Pleased?