Thursday, 26 July 2018

Bugging-In: A Safer And More Practical Alternative To Bugging-Out

The post Bugging-In: A Safer And More Practical Alternative To Bugging-Out Read more on: http://www.totalsurvival.net/

Bugging-in may end up being a more practical decision in the long run as opposed to bugging-out.

If you look around the internet these days, you might get confused about whether it’s better to be bugging-out or bugging-in should a disaster strike. It seems like most of the big name preppers are recommending bugging-out, rather than staying at home. But for most of us, that option may not really be all that practical. Being able to bug-out effectively requires a lot of money and a lot of preparation.

3 Kinds Of Bug-Out Situations

Actually, there are several different types of bug-outs that one might find themselves involved in. They differ in the reason for bugging-out and the destination:

  • Bugging-out to another city because of a natural disaster. Before hurricanes Katrina and Sandy, the government was telling people in the storms’ path to evacuate. In this case, you end up in a temporary shelter or a hotel. After the disaster passes, you can go back home (assuming your home survives the disaster).
  • Abandoning your home to go to a prepared location at the first sign of trouble. This is the luxury version of bugging-out. This process requires the time and resources to buy and/or build an alternate location and stock it for long-term survival.
  • Bugging-out to an unprepared location because you have to abandon your home. In this scenario, you don’t have a prepared bug-out location. Additionally, you are forced to evacuate your home due to a breakdown in society. This is what most people who bug-out are thinking they will end up having to do. While the chance of survival for these people will be better than staying at home to be shot, it will still be rather minimal.

Drawbacks In The Bugging-Out Concept

Looking at these options, it’s clear that unless you have a well-prepared location to go to, bugging-out may not be all that good an idea. Oh, I know that there are hordes of people out there who think that they can live off the land. Nonetheless, the reality is that they can’t. Game isn’t as plentiful as it was back in the pioneering days and the population is much larger. With all the people who are thinking they can just hunt for their food, chances are what game there is won’t last long.

New Relocation Manual Helps Average Americans Get Out Of Harms Way Before The Coming Crisis

Most of us can’t afford to buy land in the mountains and build ourselves a nice little cabin in the woods. In reality, bugging-out may not be the great option that many tout it to be. In fact, bugging-out may be akin to signing your own death warrant.

Besides natural disasters, the biggest reason for bugging out is a general breakdown of society. Should that nightmare happen, there will be mob violence, theft, vandalism, and all sorts of crime. Being in the city will be outright dangerous… at least, if people know you are there. This fact will be even truer if they know you are there and have a stockpile of supplies.

On the other hand, unless you have that well-prepared bug-out location, your home is the one place you have that is best prepared for you to be able to weather a disaster. That’s where you have your equipment and supplies, along with all the other things that you possess for day-to-day survival.

Bugging-In Is A More Than Viable Option

It’s also easier to prepare your home for surviving an extended disaster than any other location. Since you live there, you can drill a well, plant a vegetable garden, and start raising chickens. All of these things are important parts of preparing to survive the aftermath of a disaster. At the same time, you can prepare your home’s passive defenses so that you are ready to defend it from any attackers.

The problem that most people have with bugging-in is fear. They are afraid that they will be too easy a target for hungry mobs who are roaming the streets. While I’m sure that there is some justification for that fear, I’m not sure that they are thinking things through.

Let’s say that there are hungry mobs roaming the streets and looking for anything that they can steal. This type of situation would be evidence of a total breakdown of society. Unless you have that prepared bug-out location, where are you going to be able to go so that you can avoid that mob? There really aren’t all that many options. Other than concealing yourself out in the woods, which is going to be much harder than most people think, hiding is going to be a problem.

Everything You Need To Know To Keep Your Home And Family Safe.

Bug-In Tips: Preparing Your Home For Defense

The best bet for most people when bugging-in is to make their home look abandoned. Then, they can stay there while making sure that they have the ability to defend their home as well. Making a home look abandoned isn’t really all that hard. All it takes is plywood over the doors and windows and for everyone to stay inside. If no light shows through the windows and no noise comes from the house, it’s going to look like nobody’s home.

Defending that home is an entirely different ballgame. There’s a lot more to defending a home than knowing how to shoot a gun. You also need to know the tactics necessary so that you can know how to control the battle. Moreover, you need to know how to set up an ambush so that you can make any fight be as one-sided as possible. Should you have to actually fight against a hostile mob, you need to have a plan to make the battle as short and one-sided as possible.

Part of this task entails setting up your home in such a way that you have a “kill zone.” This concept involves standard ambush tactics. The kill zone is a place where all your defenders can focus their fire, therefore ending the battle quickly. You need to establish your landscaping in such a way as to channel any attackers into that kill zone.

Let me tell you a psychology secret here. When faced with various ways to get from point A to point B, almost everyone will choose the easiest way. Consequently, if you want to get people into your kill zone, make the easiest path onto your property and to your front door go right through the kill zone. If every other way is harder (fences, shrubs, hedges, locked gates), almost everyone will take the path that you want them to.

Conclusion

A well-prepared home, used as a bug-in location, gives you a much greater chance of survival than bugging-out to some unprepared location. That doesn’t preclude having a bug-out plan though. Things may get so bad that you are better off bugging out and trying to live in the woods for a while. Of course, if you do that, you should also plan on coming back to reclaim your home once the hungry mob has moved on.

Don’t think that you need to have only one plan. Since none of us know what the future holds, we must be ready for anything. That means having a number of different plans and bugging-in is just one of them. So, plan on bugging-in, but also think through various scenarios and decide what events would necessitate your bugging-out. Then, create the best possible bug-out plan you can with the resources you have available to you.

You may also enjoy reading another Off The Grid News article: Starting Your Armory

Do you have any additional tips or suggestions for bugging-in? Let us know in the comments below.

The post Bugging-In: A Safer And More Practical Alternative To Bugging-Out appeared first on Off The Grid News.

This Article Was Originally Posted On offthegridnews.com Read the Original Article here

check out the full article Here: Bugging-In: A Safer And More Practical Alternative To Bugging-Out

Top 10 Ways to Grow Your Own Food

Top 10 Ways to Grow Your Own Food is republished from Total Survival

This post may contain affiliate links. If you make a purchase, I'll earn a small fee at no extra cost to you.*

Top 10 Ways to Grow Your Own Food Follow Me on Pinterest

Top 10 Ways to Grow Your Own Food Follow Me on Pinterest Growing your own food is one of the most satisfying aspects of self-reliance. There is nothing quite as rewarding as serving up a meal comprised of home-grown ingredients.

Growing your own food saves money, and it provides your family with fresh, nutrition-packed produce. Plus, you get the added benefit of knowing exactly what chemicals have – and have not – been part of the growing process.

According to a five-year study by the National Gardening Association, more than 35 percent of American households grow food either at home or in a shared community garden. If you are thinking of starting a garden or adding to your existing garden, you may be wondering which of the many methods to use.

As you might expect the method you choose depends mainly on the space you have, your budget, and the types of food you wish to grow. Keep in mind that a home garden does not have to be an all or nothing enterprise. You may find that you mix these methods in order to make the best use of your space and your time.

Here are the top 10 ways to grow your own food.

1. Square Foot Gardening

The square foot gardening method allows you to make the most of your garden space by growing plants more closely together than with traditional “single row” gardening. This method uses raised beds sectioned with a wooden grid into individual square foot areas.

You can grow anywhere between one watermelon (or another large-yielding plant) to 16 herbs (or other small plants) within one square foot. You can customize your square foot garden in many ways, adding, for example, a wire frame to keep the birds and animals away or a trellis for your vining plants (such as beans or cucumbers).

Here are some helpful resources for square foot gardening.

2. Container Gardening

Container gardening involves growing food in containers rather than planting them in the ground. This method allows you to grow food just about anywhere you have room for a pot, barrel, or another container that can hold dirt.

With this method, apartment dwellers and large property owners alike can make use of patios, balconies and other small spaces for growing fruits and vegetables.

Just about anything can be used as a container, and many gardeners get creative, incorporating everything from kids’ toys to colorful ceramic or terra cotta pots, to basic five-gallon buckets as their planters. Whatever container you choose, be sure it has drainage holes. Plants in containers do need frequent watering and fertilizing.

Here are some resources to check out.

3. Vertical Gardening

When we think of a traditional garden, we usually picture rows of plants growing side by side along the ground. Vertical gardening is the method that encourages plants to grow up, not out.

Many plants, such as tomatoes, have a natural tendency to grow up, but even plants that grow along the ground like strawberries and even pumpkins can grow upwards on a trellis. The significant advantage of vertical gardening is that you can grow more food in less space.

Once again, you can get creative with what you use to entice your plants to grow upwards. Ladders, wood pallets, window frames are all good possibilities.

Here are links for more information on vertical gardening.

4. Hydroponics

Did you know you could grow food without soil? You can with hydroponics.

In this gardening method, you plant seeds in a small amount of grow medium, such as coconut fiber, sand or gravel, until they sprout. Then, the roots grow through the medium into nutrient- and mineral-rich water. With hydroponic gardening, which is usually done indoors, plants grow more quickly than with traditional methods.

Other advantages of hydroponic gardening are little to no weeds, the small amount of space needed and the year-round growing possibilities. Some plants, such as root vegetables, do not lend themselves to hydroponics, and this method usually requires the use of artificial light

Here is some how-to information.

5. Aquaponics

Aquaponics combines hydroponics with aquaculture, which is the practice of raising fish. In this method, fish live in the water below the plants and help fertilize the plants. Therefore, with aquaponics, you can both grow plants for food and raise fish for food.

Sound intriguing? Here’s where to find out more.

6. Permaculture

Perhaps better defined as a concept rather than a method, permaculture is a way of creating a self-sustaining ecosystem to grow your own food. With permaculture, you go with the flow of nature rather than trying to control nature. For example, you use compost as a natural fertilizer and you use landscaping to help prevent erosion and to make the best use of water.

With a mix of herbs and perennials of all shapes and sizes, a permaculture garden appears more like a forest than a tended garden. If you like the idea of living at one with nature when it comes to growing your food, here is some information on permaculture.

7. Cold Frame or Greenhouse

Cold frame gardening is an excellent way to extend your growing season. You can be as simple or as elaborate as you wish, but a cold frame is a glass lid placed on top of your raised bed. The structure allows sunlight in and maintains its warmth inside for your plants.

Similarly, a greenhouse can be as basic as a plastic frame constructed around your garden or as complicated as a small house made of glass that keeps plants warm and protected outside the traditional growing season.

Here are some sources for information on these methods.

Here’s how to build a raised bed cold frame.

And here’s how to make a hoop house for a raised bed.

8. Keyhole Gardening

A keyhole garden is a specially designed raised bed with a hole in the middle for placing compost. It gets its name because the hole resembles a keyhole. The big advantage of this gardening method is that you do not have to spread compost on the surface of your garden.

Keyhole gardens are low cost and low maintenance, and they help maximize crop output in hot and dry conditions.

Here are some resources to learn more.

9. Lasagna Gardening

As the clever name suggests, lasagna gardening involves layering. In this case, you create layers of brown material (such as cardboard) and green material (such as kitchen scraps and leaves) in a lasagna pattern in your garden area.

Layer about twice as much brown material as green and let it all decompose into compost. Then, plant your seeds in the compost.

Advantages of this method are that you can start a lasagna bed right over a bed from the previous season (or on another area of your property) with little to no preparation or tilling. Weeding is also minimal.

Here is some background information on lasagna gardening.

10. Back to Eden Gardening

If you’d like your garden to be as natural as possible, you might want to consider the Back to Eden method, which is named for the Bible’s Garden of Eden.

Back to Eden gardening is a form of organic gardening that incorporates soil covering. With this method, you place a soil covering of wood chips or straw on top of the soil and then place compost on top of that layer. The covering keeps soil moist, and the wood chips prevent the soil from becoming too compact.

Back to Eden garden is low maintenance in terms of watering, fertilizing, and weeding. To learn more, here are a few sources.

Of course, there are many other gardening methods and combinations of gardening methods – both traditional and non-traditional.

As you explore these and other gardening ideas, you will eventually find a combination that works well for your property, your time, and your budget.

Want to prep but not sure where to begin? Sign Up for Our Newsletter and get your FREE One Year Urban Survival Plan!

Sponsored LinksThis article first appeared on urbansurvivalsite.com See it here
Originally Published Here: Top 10 Ways to Grow Your Own Food

How To Protect Your Family With A Fortified Front Door

How To Protect Your Family With A Fortified Front Door Find more on: http://totalsurvival.net/

Having a fortified front door can make a world of difference in keeping your home safe from criminals.

The most common entry point into a home for burglars or attackers is the front door. Regardless of how many other ways there are to enter a home, burglars follow the way that we all typically use to enter a home. Therefore, it behooves any homeowner who wants to protect their home from intruders to make sure that they have a fortified front door against unwanted entry.

You may be sitting there saying, “No problem, I’ve got a deadbolt.” Well, let me and my boots pay your home a visit. Then, I’ll show you how one quick kick can eliminate that deadbolt and open your door. A single deadbolt isn’t enough to keep anyone out, except little children and obnoxious salesmen.

Fortified Front Door Tip #1: Deadbolts

To ensure that nobody can get in your front door takes much more than a deadbolt. You need several points of attachment to ensure that your door can’t be broken into. So, put that deadbolt in, but don’t stop there. You should add two more.

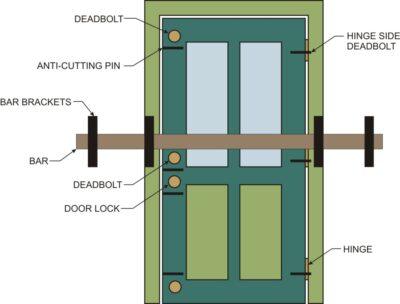
To get the most out of your deadbolts, you need to spread them out. If they are close together, the wood door frame can break out in one place. As you separate them, you need to put one near the top of the door and one near the bottom. Consequently, an attacker has to break three separate deadbolts out, not just one.

Since you’ll only use the other two deadbolts when you are home, you can install them in such a way as to not be visible from outside the door. This trick will add to the surprise when they can’t just kick your door in. To do this, cut out the opening for the deadbolt, but don’t go all the way through. You’ll still have a 1/4 inch hole where the pilot bit goes through. Nevertheless, you can plug that and sand it smooth.

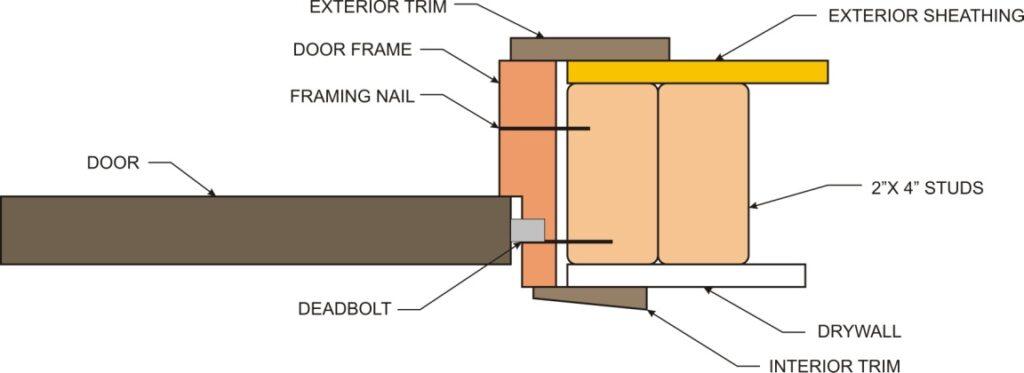
Another important part of installing your deadbolts is to make sure that they go all the way through the doorframe, into the home’s framing. Typically, only a few finishing nails hold the door frame in place, so it isn’t very strong. If the deadbolt only goes into the frame, and the frame doesn’t break, the door and frame can be kicked in together.

fortifying door installation

This diagram shows the cross-section of a typical front door installation. As you can see, the deadbolt is only going into the door frame, and only a few finishing nails hold this in place. Six 15 gauge nails are normal on each side of the frame. The space between the frame and the studs is typical as well. This is because companies make most rough door openings slightly oversized and then they install the door frame with shims.

A longer deadbolt, which goes into the 2”x 4” stud is considerably stronger. You can also strengthen the door frame itself, by attaching it in more points. Instead of using finish nails, you can use drywall screws for added strength. These can then be puttied over and painted, making them invisible.

New “Heavy Metal” Lock Systems Designed For A New Lawless America

Fortified Front Door Tip #2: Hinge Side

Front doors are typically installed with three 3-1/2” hinges. The hinges themselves are fairly strong if they are installed with the hinge pin on the inside (door opening inwards). Older homes may have them installed with the hinge pin on the outside (door opening outwards).

The weakness in the door’s hinge comes in the way that people usually install it. Typically, they install the hinge with 3/4” or 1” wood screws. That means that just like the deadbolt that only goes into the door frame, the hinge screws only go into the door frame as well. By removing these screws and replacing them with screws that are at least two inches long, you can add a lot of strength to the hinge side of the door.

Just as you need to make the door frame on the lock side of the door stronger by adding screws that hold the door frame to the studs, you should strengthen this side as well. This will help prevent someone from kicking out the door and frame together. There is no reason for installing screws in the lintel side of the door frame, as that won’t add any strength.

In addition to strengthening the hinge side by changing out the screws, something akin to deadbolts can be added. Four screws typically hold each hinge in place. Remove one pair of screws (the screw into the door and the matching one into the frame). Drill out the hole in the door and put in a three-inch lag screw, leaving it sticking out of the door 1/2 inch. Then, cut the head off the screw. Take a grinder and round off the cut-off end of the lag screw.

Now, drill out the hole in the door frame side of the hinge slightly larger than the diameter of the lag screw. You must allow enough room for it to enter. That means a 1/4” lag screw will need a 3/8” hole and a 3/8” lag screw will need a 1/2” hole.

Fortified Front Door Tip #3: Cutting Barriers

A determined criminal, on finding that they can’t just kick the door in, might try and cut the door around the lock and deadbolt. You can easily thwart this act by putting steel rods into the door. You should install these rods above, below, and between the door lock and deadbolt. Then, if they try to cut through the door, their saw will hit the steel rod and stop, probably dulling the blade.

You can buy steel rod in pretty much any hardware store or building supply center. The harder part is to find the extra-long “aircraft” drill bits. You could do this with a six-inch drill bit, but a 12-inch one would be better if you can find it.

Drill holes in the edge of the door in the desired locations. These holes need to be as deep as practical, but not hit the raised panel area of the door. Cut off sections of the steel rod that are just a touch shorter than the depth of the hole, and glue them in place. Once the glue is dry, cover the holes with a little bit of putty, sand, and paint. This will hide the work you’ve done.

Everything You Need To Know To Keep Your Home And Family Safe.

Fortified Front Door Tip #4: Glass Panels

Glass panels are the bane of many a modern door. You can do the best security job there is, but if there are glass panels, all anyone has to do is break the glass and they can reach through to open the door.

You can easily eliminate the ability to reach through these windows by putting wrought iron gratings over them. Then all they can do is break the glass. Even if they break it, they can’t reach through and open the door.

If the door has sidelights, you should do the same thing for them as well. The area near the door locks needs to have the bars of the grating very close together. You need to place the bars close enough together to prevent anyone from getting their hand through. Farther away from the door locks, they only need to keep people from crawling through the window.

Fortified Front Door Tip #5: Bar The Door

Have you ever seen a movie where they had to bar the castle door to protect against the battering ram? There’s a reason why they did that. It’s because it’s really hard to get through a barred door. Well, you can bar your door just as well as they can bar the castle door.

All you need is a 4”x 4” that’s long enough to cross your door and reach to the studs and some brackets. You’ll probably have to make the brackets yourself out of 1-1/2” or 2” strap steel. Be sure that you mount them into studs and not just into trim or drywall. I don’t care what type of mounting hardware you use. If you just mount them into drywall, then you may as well not bother. On the other hand, if you mount the brackets into studs with two-inch lag screws, then they won’t be able to break it loose.

A door that’s prepared in this way can still be broken. Nonetheless, instead of using a boot or even an improvised battering ram, they’re going to have to drive a car through it. Most assailants won’t want to bother doing that unless they are extremely desperate. Common criminals will definitely avoid it, as they don’t want to leave that much evidence behind.

fortifying door barred

You may also enjoy reading an additional Off The Grid News article: Important Home Defense Reminders

Do you have any additional tips or suggestions on protecting your family with a fortified front door? Let us know in the comments below.

The post How To Protect Your Family With A Fortified Front Door appeared first on Off The Grid News.

This Article Was Originally Posted On offthegridnews.com Read the Original Article here

This Article Was Found Here: How To Protect Your Family With A Fortified Front Door

Wednesday, 25 July 2018

Drones Hunt ‘Criminal’ Arsonists In Greece Forest Fires

Drones Hunt ‘Criminal’ Arsonists In Greece Forest Fires See more on: http://totalsurvival.net

Ten tourists drowned when a boat capsized trying to rescue them from gale-driven forest fires which have killed at least 74 in Greece and which may have been started deliberately.

A mother and son from Poland were among the dead when the vessel flipped in the water amid rough seas after picking up guests from a hotel in Mati as forest fires tore through the resort, 25 miles from Athens.

In the same village, a number of holidaymakers and locals were burned alive, some of them trapped in their cars in traffic jams, as hundreds tried to flee the raging inferno, which also devoured more than a thousand homes.

Dashing to the water was the only way to escape for most villagers, but some – including families with children found clasped in a last embrace – perished behind a wall of flames and toxic smoke as the ‘lightning quick fire’ swept from the hillsides to the sea in less than ten minutes.

Charred bodies were found on a narrow road clogged with traffic in the village, which a local mayor said now ‘no longer exists’. Some survivors spent fraught hours choking on clouds of ash at the edge of the water as they waited for help and watched their town burn.

In the same resort, horrified officials found 26 bodies, apparently families, huddled tightly together in ‘a final attempt to protect themselves’. They were less than 100ft from the sea having apparently made a desperate attempt to escape from their villas – but ended up trapped between fire and cliffs. One girl died as she tried to jump into the water.

Officials have asked for US drones ‘to observe and detect any suspicious activity’ as it emerged 15 fires had started at the same time in three different areas near Athens – possibly by criminals intending to ransack homes once they were abandoned by fleeing residents.

Read More

The post Drones Hunt ‘Criminal’ Arsonists In Greece Forest Fires appeared first on Off The Grid News.

This Article Was Originally Posted On offthegridnews.com Read the Original Article here

See More Here: Drones Hunt ‘Criminal’ Arsonists In Greece Forest Fires

Relieve Pain Naturally With An Amazing Herbal Capsule First Aid Kit

The blog post Relieve Pain Naturally With An Amazing Herbal Capsule First Aid Kit was first published on Total Survival

Headache, Muscle, And Cramp Capsules

Herbal capsules can be a pivotal step in helping you to relieve pain naturally.

Did you know that people first made aspirin from common plants? Willow bark and meadowsweet both contain the active ingredient used to make aspirin and both can help to relieve pain naturally. Like many other herbs, these two have safety mechanisms built right in. Many people cannot tolerate aspirin due to stomach irritation, but unlike aspirin, willow and meadowsweet are not irritating to the stomach.

The following recipe shows you how to make herbal pain-relieving capsules. Capsule making equipment is inexpensive and easy to use. Furthermore, herb shops, natural food stores, and online resources sell them for less than twenty dollars.

If you prefer to make a tincture, you may use the same proportion of herbs. Just follow the tincture instructions that we have provided previously in our various first aid kit articles.

The recipe contains the following ingredients: cramp bark, which relaxes and comforts smooth muscle. Skullcap, a common wildflower, is relaxing and can relieve pain naturally. Valerian is a relaxant as well. Cayenne is an activator.

Ingredients

  • 00 sized empty capsules
  • 1 tablespoon meadowsweet herb
  • 2 teaspoons cramp bark
  • 1 teaspoon skull cap
  • 1 teaspoon valerian root
  • 1/8 teaspoon cayenne

Instructions

Finely powder the herbs using a coffee grinder. Fill the capsules using instructions that come with your capsule-making machine. Store in a dry, dark place.

To use, take two capsules every four hours as needed.

The hidden secrets of making herbal medicines…right at your fingertips!

BVYF Capsules That Relieve Pain Naturally

The following capsule recipe contains herbs that can effectively prevent or fight infections.

While fresh garlic is not included, it is one of the most potent herbal antibiotics known. You can even apply garlic directly to a wound (although it will sting!). Moreover, you can lightly cook garlic or take it raw. Raw garlic can cause stomach irritation, so I recommend taking it with food. Cooked garlic does not offer the same antibacterial benefits. However, it does promote heart health and aids in circulation.

The herbs in this blend are effective against bacterial, viral, yeast, and fungal infections. Unlike antibiotic pharmaceuticals, drug resistance does not build up when using herbs because the herbs are such complex compounds.

You may also make this recipe into a tincture. In that case, add a couple of cloves of fresh, crushed garlic.

As a further note on one of the ingredients, usnea is lichen which drapes trees in northern forests.

Ingredients

  • 00 capsules
  • 2 Tablespoons echinacea root
  • 2 Tablespoons barberry root
  • 1 tablespoon myrrh
  • 1 tablespoon usnea
  • 1 Tablespoon calendula flowers
  • ½ Tablespoon black walnut hull
  • 1/8 teaspoon cayenne

Instructions

Finely powder the herbs using a coffee grinder. Fill the capsules using the instructions that come with your capsule-making machine. Store in a dry, dark place.

To help relieve pain naturally, take two capsules every four hours as needed.

relieve pain naturally

A well-rounded herbal first aid kit will greatly assist you in coping with common, everyday ailments and injuries.

If you make the recipes in this series, you will have a well-rounded herbal first aid kit. Make sure that you learn about local plants in your area that you can substitute for the ingredients that I suggested. Most of the recipes can be adapted for use in other forms. For example, you can make tincture recipes into syrups, and you can tincture teas and so forth.

Other items you may want to include are summarized lists of your family’s medical records including allergies, medications, past medical history, emergency phone numbers, and so on. Keep a pen and paper with your kit in case you need to write down instructions in an emergency.

Familiarize yourself with choking and CPR rescue techniques. Additionally, keep a card that summarizes them handy. A small booklet or chart that provides basic treatment recommendations for treating common emergencies can also be reassuring.

Keep a variety of bandages on hand. Make sure to include large ones, not just 2x2s or 4x4s. Sanitary napkins and diapers also make excellent absorbent dressings. Include some non-stick and waterproof ones as well as some fluffy, rolled gauze. Keep an ace bandage in your kit along with some tape.

More Tips For Creating The Ideal Herbal First Aid Kit

Lavender and tea tree essential oils are both antibacterial and good to have on hand. Tea tree helps to relieve fungal infections. Lavender relieves burn and ear pain, plus it is relaxing. Cloves from the kitchen spice rack are antibacterial and they relieve toothache pain when you apply them locally. Soap and water are handy if the kit is not kept in your house.

Tailor your first aid kit to your family’s needs and ages. Include some of the following dried herbs if you have children.

Catnip is excellent for relieving childhood fevers; however, it does not taste good. The easiest way to administer catnip is to make a very strong tea and pour it into a tepid bath before putting a febrile child into the tub.

If you have a colicky baby who is nursing, the mom can drink some chamomile, dill, or fennel tea. The healing benefits will be provided via the breast milk.

Herbal teas can be made into popsicles to soothe children’s sore throats. Herbs can simply be powdered and mixed with yogurt, applesauce, pudding, or ice cream for easy administration as well.

Now that you know how to prepare your kit, it is time to put it together if you have not done so already. Be prepared ahead of time, and you can rest assured that you will be able to relieve pain naturally and cope with common, everyday ailments and injuries.

You may also enjoy reading an additional Off The Grid News article: For Emergency Preparedness – Prepare Your Medicinal Herb And Spice Cabinet

Do you have any thoughts or suggestions on relieving pain naturally with herbal capsules? Let us know in the comments below.

The post Relieve Pain Naturally With An Amazing Herbal Capsule First Aid Kit appeared first on Off The Grid News.

This Article Was Originally Posted On offthegridnews.com Read the Original Article here

Source Here: Relieve Pain Naturally With An Amazing Herbal Capsule First Aid Kit

11 Surprising Survival Uses for a Tin Can

27 Incredible Tower Garden Ideas For Homesteading In Limited Space