The following article How To Make A Survival Bracelet was first published to Total Survival
Paracord is a crucial part of your survival kit, and a great way to remember paracord in emergencies is to create a survival bracelet with it.
RELATED: Paracord: Everything You’ll Ever Need To Know
Why Have A Paracord Survival Bracelet?
Paracord (also known as parachute cord) is a lightweight nylon rope. Originally, it was used to suspend lines during WWII, but its smooth texture, strength and elastic nature made it ideal for other practical purposes. Best of all, it’s also inexpensive.
Outdoor sports enthusiasts, including hikers and mountaineers, quickly began making survival bracelets from varying lengths of paracord. These bracelets allow you to carry several feet of paracord in a compact, wearable form. When the need arises, the bracelet can be unravelled.
A few of the most common uses for paracord include:
• Securing cargo
• Lashing poles together (to make a raft or temporary structure, for example)
• Repairing or replacing broken straps or belts
• Assisting with water rescues
• Improvising a tourniquet
And many more.
When it comes to survival situations, paracord is extremely practical because its inner strands can also be used for an even wider range of tasks. You might need heavy duty rope or even a fishing wire – and luckily the paracord is thick enough for either instance.
In fact, paracord’s usefulness is so limitless that we’ve got a whole article dedicated to them: 82 Uses for Paracord That Will Surprise You.
Why You Should Never Leave The House Without One
Just in case you’re still not convinced of the need for a paracord survival bracelet, here are ten reasons you should never leave the house without one:
• When you find yourself in a SHTF scenario, having anywhere between 8 and 12 feet of paracord on you can be the difference between life and death. Extra points if you made your survival bracelet yourself and know how to do ropework!
• Some manufacturers have actually started integrating a strand of 15- to 25-pound fishing line to their paracords.
• When you use a buckle that includes a small Ferro rod and scraper, you always have a way to start a fire in a pinch.
• Buckles that feature a small whistle will also help you signal your location to rescuers.
• The paracord can be invaluable in building a shelter when SHTF.
• Some paracords also include a snare wire, which can be used for trapping and snaring food in a crisis.
• When SHTF, you may find yourself needing to restrain a looter while waiting for the proper authorities. A survival bracelet can be re-purposed as field-expedient handcuffs.
• Buckles that include a small compass can help you find magnetic north if you’re lost or stranded.
• Your survival bracelet can be used to improvise shoelaces if they break while moving out by foot.
• Being able to repair your clothing and gear are important skills to have. Paracord provides plenty of sewing material if need be.
RELATED: Top 10 Reasons To Never Leave Home Without A Paracord Bracelet
How To Make Your Own Paracord Survival Bracelet
There are several different ways to make your own survival bracelet out of paracord.
Some of the most practical options are:
• The Fishtail Weave – fairly easy to make and deploy, this is a great way for beginners to get started.
• Law Enforcement Style – so-called because it’s usually made with two blue stripes and a black center strip and also used by law enforcement. This is another beginner-friendly style.
• The Blaze Bar – another quick deploy design, the Blaze Bar looks rugged and carries 13-feet of paracord.
• Ladder Rack Knot – similar to the Blaze Bar, the Ladder Rack Knot provides you with a more than average amount of easily wearable paracord.
• The Cobra – one of our favorites, the Cobra paracord survival bracelet is rugged looking and incredibly durable.
You can go ahead and follow the links above to see how each of these 5 designs are made. Keep reading for a step-by-step on the Cobra!
Making Your Own Cobra Bracelet
First things first, you’ll need to gather supplies:
• 10-feet of paracord
• 1x side release buckle (you can use a plain one, or one with a Ferro rod and scraper, a compass, and/or a whistle – it’s up to you)
• Tape measure
• Sharp scissors
• A lighter
Step 1
Once your paracord has been trimmed down to about 10-feet, make sure both ends are properly sealed with your lighter. Frayed ends are going to be counter-productive and mitigate the usefulness of your survival bracelet in the long-run.
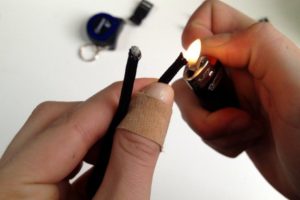
Once that’s done, wrap one end around your wrist until it sits snugly. Lay this section next to your measuring tape – this will tell you how long your bracelet needs to be.
Step 2
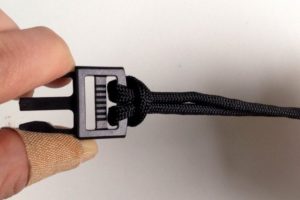
Start attaching the male buckle by folding your paracord in half and pulling both ends through the bottom slot. This will create a loop on the other side – pass the ends through that loop and pull them all the way through. This will secure the paracord to the buckle.
Step 3
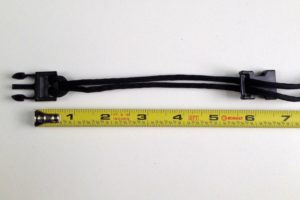
Now it’s time to attach the female buckle. To do so, pull the ends of your paracord through the bottom slot and slide the buckle toward your desired length. Remember to use your measuring tape for accuracy!
Make sure to measure from the center of the male buckle to the end of the female buckle. In the example below, we’ve measured for 6.5 inches.
Step 4
It’s time to get weaving!
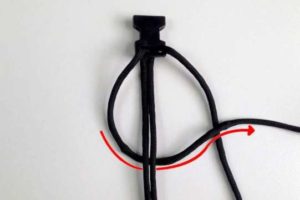
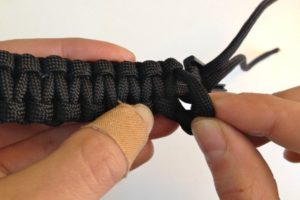
Working from the female buckle’s side (which is still loosely attached), pull the left strand under your center pieces and over the right strand. Next, the right strand needs to be pulled over the center strands.
Here’s where it gets a little tricky, so use the next picture for reference. You need to pull the right strand first over, then under the left strand before pulling both strands tight.
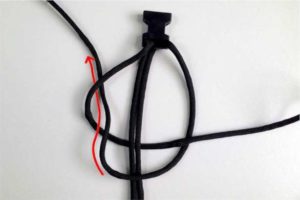
Congratulations – that’s your first knot done!
Step 5
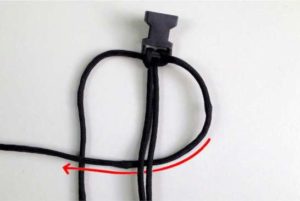
Now you need to repeat the process – only this time, you’ll start with the right strand.
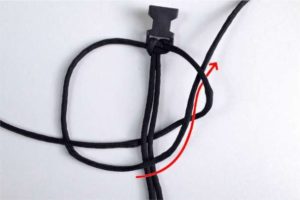
Just to be sure: Take the right strand and pass it under the center pieces and over the left. Then take the left strand and pass it over the center pieces and first over, then under the right strand. Pull both strands tight, and you’ve got your second knot complete!
Step 6
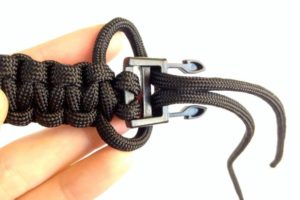
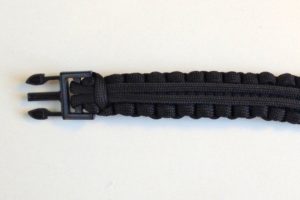
Simply repeat steps 4 and 5 above until you get to the male buckle. Pass the ends of your strands through the buckle’s second slot, lift the last braid to form a loop, and pull the ends through it. Pull tight to ensure that it’s properly secure.
Step 7
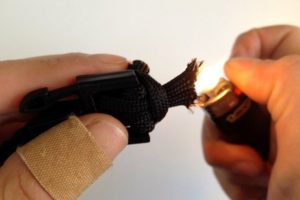
Trim the ends with your scissors and then use your lighter to seal them.
Interested in any of the other survival bracelet designs? Check out our ultimate How To.
Other Paracord Survival Gear Projects
Has the paracord bug bitten you?
After making yourself a few survival bracelets, why not also try your hand at a few other projects? Be sure to check out our 36 Awesome Paracord Projects For Preppers.
You can use varying lengths of paracord to make yourself a belt, a keychain with a secret compartment, rifle sling, watchband, hanging chair, dog collar or even a wallet!
All photos in this article are owned by Survival Life.
This Article Was First Found at survivallife.com Read The Original Article Herecheck out the full article Here: How To Make A Survival Bracelet
No comments:
Post a Comment