Exiled Chinese businessman Guo Wengui recently revealed leaks from Wuhan crematoriums. He claims based on the number of bodies their furnaces are burning, the death toll could be as high as 50,000. A Chinese billionaire and whistleblower who lives in U.S. exile says Wuhan crematoriums have burned 50,000 coronavirus victims. | Credit: Chinatopix via AP
The official coronavirus death toll in China is a little over 800. But an exiled Chinese businessman says crematoriums are leaking the real figure.
A billionaire whistleblower alleges Wuhan has crematoriums working 24/7. He claims they’ve cremated some 50,000 coronavirus victims.
Guo Wengui is a Chinese billionaire living in exile in the United States.
The official coronavirus death toll is some 800 people in China. The current official death toll worldwide, outside of China, is 774. But a Chinese billionaire with a history of blowing the whistle on his former government says the real figure is much higher. Exiled Chinese businessman Guo Wengui recently revealed leaks from Wuhan crematoriums. He claims based on the number of bodies their furnaces are burning, the death toll could be as high as 50,000. Wengui made the bombshell allegations in an interview with former White House chief strategist Steve Bannon.
Whistleblower: 1.5 Million Coronavirus Cases In China, 50,000 Coronavirus Deaths In Wuhan
He also claims to have inside information that there are 1.5 million confirmed coronavirus cases in China. Wengui is emphatic that these are not merely quarantined or “under observation” but confirmed cases of coronavirus infection: China has struggled to contain the coronavirus. But it has also struggled to contain public outcry against censorship and tight control of information. Dr. Li Wenliang, who sounded the alarm about the disease, succumbed to an infection and died this week. The Chinese government arrested him for blowing the whistle. Then officials tried to suppress news of his death. Afterwards, millions of Chinese citizens saw the hashtag #IWantFreedomOfSpeech on Mandarin language social media. But the Chinese government censored that too.
Are Wengui’s Crematorium Claims Credible?
Watch VICE’s 2017 profile on Guo Wengui. At the time, he published bombshell documents alleging corruption in the Chinese government. He got the attention of the media and reportedly the U.S. State Department. …
If you're looking for a review of the ultimate energizer guide then you have come to the right spot because in this exclusive article we're going to blow the lid off the ultimate energizer once and for all and reveal weather it is the real deal or not. This brings us to the review of the ultimate energizer guide. This is a program that provides users with classified information on how to build a free energy generator. But can the program really make you achieve this? does it work? will it be worth your investment, time and energy? all these questions and more are what this review on the ultimate energizer program seeks to help you find answers to. The ultimate energizer review - is it worth it? > Click here to get access to the ultimate energizer guide now
About The Ultimate Energizer guide
The ultimate energizer is your ultimate guide to building your own alternative and portable energy source to power up any of your household appliances including refrigerators and aircon units. It is a very affordable way to having an emergency generator that can help you save more than 50% from your electricity bills without spending too much on other alternative energy source like solar panels or wind turbines which is costly and will also need a lot of space. The ultimate energizer causes you to be calm about the electricity bill. This well ordered guide shows you how to manufacture this claim “home energy gadget” today impeccably. This will dispose of your energy charge ensured. It is lost to the earth which means we need to really take care of it in order to reduce the cost of energy bills which introduces the ultimate energizer guide.
About The Ultimate Energizer Creator
The creator of the complete the ultimate energizer guide is steven perkins. He found the journal of the founder of this technology in his home when his father shifted near quebec city in canada. In this post, we will review the ultimate energizer whose creator claimed to offer a way through which you can generate non-stop current. According to the author, you can drop down your electricity bills by 80%. Of course the ultimate energizer owners provide resources. But the truth is that you are a master creator. All of them have that talent in us. The only difference is the extent to which it is hidden in each of us.
Features of The Ultimate Energizer
The features of the ultimate energizer guide are as follows:-. This program guide will help you to design a the ultimate energizer generator which will follow the rules of linear induction motor which is built around a track that is orbicular to maintain the smooth motion of rotors that are transportable. You can find here, a extensive review which highlights all the important features and performance criteria of the ultimate energizer. Use of the the ultimate energizer is very easy since all of the functions can be accessed in a short time; you have complete control over it. 100% money back guarantee shows that the ultimate energizer really works. The ultimate energizer gives full customer support for 7/24/365, also, features, credibility and the ultimate energizer’s ease of use are favorably satisfied by the buyers. Use it on any electrical appliances from small clocks to big plasma tv screens, refrigerators, and air conditioners. Power the cabins while hiking to the mountains or camping. Other essential features of this complete the ultimate energizer are that it is easy to assemble and does not require a technical background to master engineering.
Pros and Cons of The Ultimate Energizer
I’ve created this honest ultimate energizer review to help you make a well-informed decision. I’ve tested it myself and now i’m going to share with you all the key aspects you may be interested in: how does it work? is it really so powerful and effective? what are its pros and cons?. It is non-polluting. It remains popular the ultimate energizer guide pros & cons because it is both a renewable and clean source of energy. Harnessing solar energy is more than a fine idea it’s currently a reality in thousands of homes in a lot of nations around the world. >> Click here to get access to the ultimate energizer guide now On the review of the ultimate energizer guide, we will be looking into what exactly the program is all about, the details of the energy generator program, the benefits, pros & cons and our conclusion on the program.
Does The Ultimate Energizer really work?
The device is usable during emergencies. It works without fuels and therefore there are no expected fumes. It is weather proof. Cons of the ultimate energizer. You can only download the program from the official website. But the ultimate energizer reviews that are available from real users online on platforms like google and youtube seem to confirm that the device does indeed work. So, as per my ultimate energizer review answer to the question is the ultimate energizer legit? is definitely yes. The ultimate energizer guide. The ultimate energizer is said to work for your home and cut electricity by 82%, guaranteed by tomorrow. The ultimate energizer reviews. It can boost any type of electricity by as much as 5 times.
Advantages of The Ultimate Energizer Program
The program can benefit you in many ways. Below we are listing the advantages of using the ultimate energizer program for generating electricity:. This device will help you save up to 60%-70%, without investing money in solar panels which can cost you a lot of money. There are additional the ultimate energizer guide program advantages too, including advantages at tax time, so do your homework on what you might have for being a solar power pioneer contributed back.
Why The Ultimate Energizer is Useful?
The ultimate energizer is a complete guide and blueprint. With it, you get everything you need to know to build your own free energy generator. This generator can be completed for less than $50 if you have some tools already. But i remember reading another review of the ultimate energizer, and the guy said he took days. Maybe he was crafty. Then, you assemble it and get it to work. You will be guided step by step, that anybody who can read can build it. You do not need prior building experience or massive strength; it is that easy. Building the ultimate energizer takes under 4 hours if you are slow and definitely a lot less when you have help. The ultimate energizer has already changed the lives of over 30,000 families who chose to power their homes using this eco-friendly device. This is definitely a good investment that is worth your time and money and if you think it isn’t after trying it out, you can request for a refund.
Is The Ultimate Energizer a Scam?
The ultimate energizer guide really show you how to power your house and save tremendously, or is this just another overhyped scam? this system was created after its owner decided he wanted to have a home power generating system in case of any crises or disasters. The ultimate energizer pdf. It does not need any conventional electric power. The ultimate energizer scam. In this program, you can also build more generator and sell for profit. This product can also be incorporated into the automobile to power an electric motor. All you need is an open mind and a desire to try new things to get a life in the field of freedom of energy. So, what are you waiting for? it’s time to say goodbye to major energy companies and start using the ultimate energizer guide today.
Watch this video demonstration of the ultimate energizer guide put into action
Every prepper knows it’s a great idea to stockpile ammunition when preparing for a major disaster. You can use it for hunting, self-defense, or barter. But which types of ammo should you stockpile? If you plan on bartering, then you don’t want a bunch of calibers that nobody wants. And that’s just one consideration.
In this video, Reality Survival & Prepping talks about what he thinks are the 5 best types of ammunition to stockpile for a collapse.
Here are his picks:
.22 LR – Very common, good for hunting small game, very light and small.
9mm Luger – Great for self-defense, fits in a wide variety of handguns.
5.56×45mm or .223 Remington – Also very common, cheap and effective.
.308 Winchester – Widely used, works in AR10 and bolt-action platforms.
12 Gauge – You can do a lot with it — hunt, defend yourself, etc.
In the video below he makes a much more detailed case for each caliber. What do you think of this list?
This article first appeared on urbansurvivalsite.com See it here
Learning How to Make a Spear Is a Must for Survivalists
Whether you’re in an authentic survival scenario or just up at the lake for a weekend camping trip, you’ve got to eat. But what if your food supplies are running low, or worse, you never had any, to begin with?
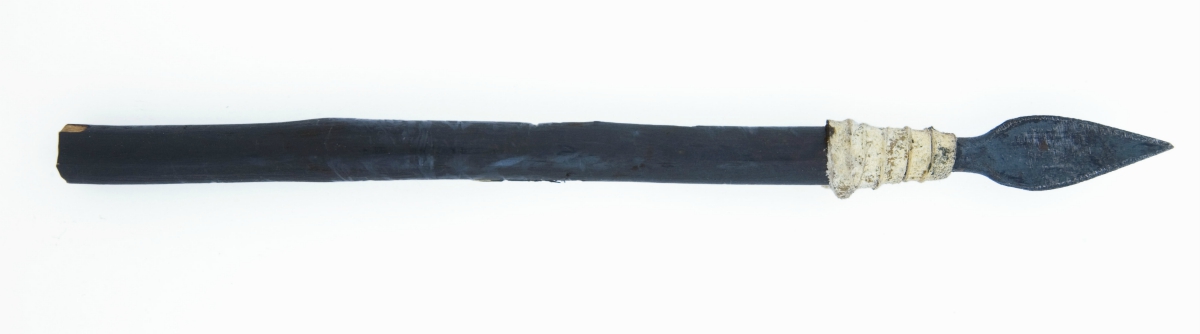
That's when knowing how to make a spear comes in handy. Here, we’re going to show you how to make a hunting spear from wood.
We’ll also offer some basic fire-hardening techniques to prolong the life of your spear. Stick around to the end to learn the most effective way to make this multifunctional, primitive hunting tool.
Along the way, we’ll pass on some important safety warnings and tips. Before you get started, here are a few things you'll need:
1. Spear Pole
|
We recommend a small, green sapling approximately 2 – 2.5 inches in diameter, and a few inches taller than you are. (We'll tell you why later.)
Tip: When choosing a tree for your spear pole, choose as straight a sapling as possible. We recommend hardwoods such as hickory, oak or maple.
Hardwood works best as a baton. This is essentially an improvised hammer and will serve to help provide an effective downward force to split your spear into segments without breaking it.
These can easily be found on the forest floor or you could even use a leftover piece of your sapling if it's thick enough. Make sure it is not rotten, as a rotten log will simply fall apart.
You can easily tell if the baton is rotten with a few quick, solid thumps against a tree stump. If it doesn't shatter, you should be good to go!
Paracord is my cordage of choice due to its strength, durability, and resistance to rot in damp conditions, but any cordage can work in a pinch (Even your shoelaces)!
Tip: You can never have enough cordage in a survival situation… you might just be surprised at how many different uses you can find for it!
|
A strong serrated knife will work… but having a pocket folding saw will save you a ton of time, work and hassle! Another secondary option would be a pocket chainsaw or even a wire saw.
In my opinion, however, no good survival or camping kit is complete without a folding pocket saw. Here's a good one to grab.
Once you’ve cut your pole, saw off the fat end to make the surface flat and even. Take your cordage and wrap the pole about 10 inches below the working end.
This will help keep the pole from splitting out once you begin the batoning process.
WARNING: Make sure your spear stands at least as tall as you do. This will help ensure the sharpened points of your spear are above eye level, just in case you take a fall while out on the hunt.
Step 2. Split and Sharpen the Working End of Your Spear
Once you’ve wrapped the working end of the spear with cordage, butt the opposing end up against a tree or stump to help stabilize it. Slowly baton 8-10 inches straight down.
Turn your knife perpendicular to the first split and repeat the batoning process.
Next, find a couple of three-inch sticks about the diameter of a pencil and slide them firmly in place between the splits to keep the spear points expanded. With your knife, sharpen each of the four points.
Step 3. Harden the Spear's Points with Fire
Once the points are sharp, remove the cordage and place the sharpened points below the coals of a fire for 10-15 minutes. This speed dries or “fire-hardens” the wood.
Tip:Be mindful of your spear during this process; check it often to make sure it’s only drying and not burning.
Side Note: An alternative drying technique is to hold the spear just above the flames of your fire like a marshmallow so the flames lick the points of the spear.
While this technique may take longer, it’s easier to keep an eye on the spear points to make sure they aren’t burning.
Step 4. Reinforce the Spear
Once the spear is removed from the fire and allowed to cool, latch the three-inch wooden pegs in place to reinforce the spear during impact. Align your cordage vertically against the shaft of the spear and create a loop.
Next, wrap cordage around the shaft while alternating over and under the wooden pegs.
Step 5. Finishing Touches
After two or three times around, slip the working end of your cordage through the loop you created earlier, and give a stout tug on the other end. When done correctly, this will tighten the pegs up nicely and leave you with a durable, four-prong spear point.
You can also opt to sharpen the other end of the spear into a single, fire-hardened point for self-defense against potential predators.
Watch this video from AVmake for an alternative which is how to make a spear for fishing out of bamboo:
There you have it, survivalists! A sturdy spear good for self-defense and harvesting small game and fish. Your DIY survival spear will work great to take down small game and fish, but when it comes to larger game you'll need a more heavy-duty weapon.
What do you think of our tutorial on how to make a wooden spear? Sound off in the comments section below!
Want to know how to do natural highlights at home? If you want to know how to highlight hair naturally, then try these hair highlight ideas.
DIY Natural Highlights at Home
Is your hair single toned, and you’d like to spice up your image by dying your hair in highlights? If yes, scroll through this page and discover the possibilities on ways to dye your hair naturally!
All are very easy and cheap! Try these DIY highlights today!
Lemon Juice
No, forget the bottled stuff! Even if it’s organic, juice from freshly cut lemons always works better.
Dilute 2 tablespoons of fresh lemon juice with 1/4 of a tablespoon of water from the tap. Then, take a cotton ball, dip it in the solution, take a strand of hair, and slide the soaked cotton ball through it. Continue doing this to several strands of hair, spacing them evenly.
Now, go under the sun, until your hair completely dries.
Chamomile Tea
Brew a cup of natural chamomile tea, and once it cools, either poor it all over your hair, or just like with the lemon juice, simply apply to separate strands of hair.
Next, sit outside, under the sun until your hair dries.
Baking Soda
Mix baking soda with just enough water until that it becomes a paste. Apply to hair, leave it on for half an hour (or longer, depending on the shade of the highlight you prefer), and then wash it out.
Apple Cider Vinegar
This method will leave your hair with a natural reddish color.
Mix ACV and tap water 50/50, and apply onto your hair just as you would with the chamomile tea.
Salt
Remember how the ocean water lightens your hair? Salt does the trick!
Mix 1/2 tablespoon salt with 1 cup of water, and apply to hair. Go out under the sun, and after half an hour wash it all off.
Honey And Olive Oil
This method will slightly lighten your hair, leaving it nice and smooth.
Mix 1/4 cup of olive oil with 1/4 cup honey. Mix well, and apply to your hair. Leave on for an hour, and then wash out thoroughly.
Enjoy your natural highlights!
Want to see honey in action? Then watch this video tutorial from AndreasChoice:
What do you think of these natural hair highlight ideas? Let us know in the comments section what your thoughts are on how to do DIY hair highlights at home. Which one will you try?
Let's say you got lost in the wild, and you somehow forgot or lost your Cold Steel Leatherneck Tanto 39LSFT (or whichever is the best survival knife for you). What do you do?
While your situation is most likely not quite as bad as Tom Hanks had it in Castaway, let's face it. The only way you're gonna get out of this situation in good shape is to let out your inner caveman.
Let me explain. Our very primitive ancestors lived in a time when every day was a survival situation. Any tools or weapons they needed had to be made from scratch.
So, should you be unlucky enough to have only the shirt on your back while you're lost in the wilderness, you'll have to follow suit. Let the training of your inner caveman begin.
Today's lesson: how to make DIY weapons in the wild with only the resources nature provided you.
How to Make a Knife | Homemade Weapons
Having a knife, any kind of knife is probably one of the best things to happen should you suddenly find yourself in a survival situation. You can use it to help you find food, build a shelter, and defend yourself against wild animals.
So it's highly fortunate nature is waiting like a momma at a craft table with lots of materials you can use to create one.
1. Stone Knives
Bone, shell, bamboo, wood, or even an old aluminum beer can may work to perform the puncturing function of a blade. You know you've seen these a million times when you're out hiking.
They're easy to crack or break or shape into a fairly sharp point which will do in a pinch. Unfortunately, you're not going to be able to use a chicken bone or an expertly-shaped aluminum can point to skin, chop, baton, or any of the other necessary functions of a survival knife.
This is where the stone comes into play. I'll start by saying making a knife out of stone isn't easy, but it can be done.
You'll need three things: a core rock, a hammerstone, and a pressure flaker. Remember, you're going to be smashing these together in true caveman fashion.
So, having stones you can reasonably grip in each hand is going to make your life a lot easier. Although, it's definitely an option to stand poised over one rock smashing down on it.
You, with a two-hand grip, pounding until you've chipped away at it a bit. But I'm getting ahead of myself.
2. The Core Rock
The core rock is what you'll be making into a blade. Find any large stone, preferably made from obsidian, slate, chert, or flint with a relatively flat side.
In case you weren't a rock collector in any of your previous lives, here's another way to decide if a rock meets the requirements for good knife-making material. Tap or click a rock together with another rock and listen for a ringing sound (like glass).
The more rock sounds like glass, the better it is as a material for your core rock. If you can, choose a rock which is already a bit sharp to reduce the amount of time you'll need to shape it.
3. The Hammerstone
The hammerstone is a medium-sized, spherical rock, preferably made of granite. It will be used to smash, chisel, chip and shape the core rock.
You'll be using it to chip off pieces of the core stone and to narrow the edges to a blade shape.
The pressure flaker, or flaking tool, is a rock with a sharp point to help you refine the blade's edges. You'll use your flaking tool after you've thinned the edges of the stone with the hammer stone to make the “blade” sharper.
When you start making your knife, you'll want to be sure to wet the core stone to shorten the time it takes to shape it into a blade. Begin by striking glancing blows near the edge of the core rock with the hammerstone.
Chip away at the core rock until you get the general shape of a blade. Then, use the flaking tool to refine the edges you need to sharpen.
You can also use a stone with a rough surface such as a sandstone to sharpen the edge. Use some rope, cloth, or leather to lash the base and create a handle.
If you are having troubling shaping the rock into a knife, you can opt to create stone blades instead. Check out the videos below to learn how:
Part One:
Part Two:
How to Make a Spear | Homemade Weapons
We've talked about how to make a spear using your best survival knife in a previous article. The same principle applies here.
Even without your Cold Steel Leatherneck Tanto 39LSFT or whichever survival knife you normally bring with you, you can still make a spear using your newly made stone knife. To make a spear, you'll need to find a five-foot-long stick tough enough to endure repeated short or long-distance throws.
First, pick the end of the stick which has a more rounded tip and use your stone knife to start shaving to create a spear. Once you're done, be sure to heat the spear over some hot coals to make your spear sharper.
As an alternative, you can also make a spear by tying your knife onto a stick. Find a stick which is about an inch wide.
Measure about 2 inches from one end of the stick. Mark the point, then split the stick into two until you reach the 2-inch mark, creating a sort of Y shape.
This will create a space where you can stick your stone knife before you lash it on with some twine, cord, or rope. To lock the blade in place, put some moss or lichen in the remaining space.
If you haven't had time to fashion your knife out of stone yet, you can also use broken pieces of shell or glass or splintered bamboo or bone and secure it to the end of your stick.
If you find a way to split your stick without a knife, you can insert the splintered bone or bamboo into the wedge and tie it off like you would when turning a knife into a spear.
How to Make a Weighted Club | Homemade Weapons
While sharp pointy tools are all well and good, you can never go wrong with a blunt homemade weapon. You can use it for hammering or bludgeoning something such as a weighted club.
The weighted club could be one of the deadliest ancient weapons. To make one, you'll need the following: a piece of wood around 14-16 inches, a medium-sized rock, and some rope.
Once you have all the materials, you'll need to wrap some lashing 6-8 inches from the end of the stick.
Split the same end until you reach the lashing in order to create a V-shaped notch. The rock you picked out should be shorter than the length of the split.
Insert the stone then lash it securely (above, below, and across the stone). The lashing on the stick above the stone clamps both sides of the split together providing the first point of security, so it's especially important to create a good, tight lashing above the stone.
You'll want to make sure you bind the split ends securely so the stone won't fall off whenever you use it to hammer or pound on something.
This video from Wannabe Bushcrafter will show you how to make a bamboo knife:
Now, hopefully, you never find yourself in a situation where making homemade weapons is going to be a necessity for survival. But, if you do find yourself in such a quagmire, this little bit of information and inner caveman training may be what saves your life.
Which of these homemade weapons do you want to make? Tell us your progress in the comments section below!
Apple cider vinegar benefits the body, internally and externally. There are many home remedies and apple cider vinegar uses that you can do to combat odors, ailments, and more! Keep reading to learn all the benefits of apple cider vinegar. Stay tuned and learn to make your own.
Benefits of Apple Cider Vinegar | Home Remedies & Apple Cider Vinegar Uses
By Tara Pelette
A product that can be used as an ingredient in food, a cleaning product, and to improve your health is a necessity to any homesteader. Not to be mistaken for other beneficial fermented products making their way back into the spotlight, Apple Cider Vinegar’s benefits and variety of uses outshine all of the others.
There has been a lot of buzz around Apple Cider Vinegar in the nutrition, homesteading and environmental communities. I will breakdown why this ingredient commonly used in salad dressings and condiments can be used for more than just food. Anyone close to me can verify that I swear by Apple Cider Vinegar, as it is something I use daily. I believe it will become one of the most important things at your disposal too.
It is very simple in its composition. Apple Cider Vinegar is made from crushed apples that are left to ferment over time. Wise Geek, defines fermentation as, “the conversion of a carbohydrate such as sugar into an acid or an alcohol.” In this case we are looking at Acetic Acid, which is formed through the fermentation process and is the main component of all vinegars. The simplicity and natural processing that takes place in order to produce Apple Cider Vinegar makes this product not harmful for the environment or to you and your loved ones.
“Apple Cider Vinegar contains necessary ingredients, such as enzymes, and life stimulating minerals, mainly potassium, in a natural state,” claims Braggs Live Foods, a brand that makes raw, unpasteurized Apple Cider Vinegar. These enzymes and minerals are present in the vinegar as web-like strands known as the Mother, giving Apple Cider Vinegar its cloudy appearance.
This product is only worth your while in a raw, unpasteurized state, as heat from the process of pasteurization destroys the beneficial enzymes and minerals. The brand I prefer is Braggs as referenced above, but there are many beneficial brands out there! The best way to distinguish a good brand is by ensuring that the Apple Cider Vinegar is unprocessed.
According to Apple-Cider-Benefits.com, “recorded vinegar history starts around 5000 BC.” They state that during this time Babylonians made vinegar to use in food and as a preserving and pickling agent. They also report that vinegar has been found to have been used in Egypt around 3000 BC and in China around 1200 BC.
“In ancient Greece, around 400 BC, Hippocrates, the father of modern medicine, prescribed Apple Cider Vinegar mixed with honey for a variety of ills, including coughs and colds,” a remedy that is still being used today.
They also state that vinegar was used in the military as a “strengthening and energizing tonic,” which also had the benefit of killing any internal infections. In the same way, vinegar was used topically, “to clean and disinfect soldiers’ wounds.”
Apple Cider Vinegar has been used in different cultures through the years and has had its waves of popularity come and go, but its benefits have never changed.
report this ad
Braggs Live Foods claims it to be so beneficial that it, “Helps removes body toxins
Helps promote a healthy body
Helps support a healthy immune system
Helps maintain healthy skin
Helps control weight
Improves digestion and assimilation
Soothes tight aching joints and sore muscles
Soothes irritated skin”
As it is so diverse, healthy and simple, due to its lack of processing it can be a beneficial and permanent addition to your everyday life. Apple Cider Vinegar can be an immune booster, an antiseptic, a facial toner and an all purpose cleaner. Once you try it out I am sure you will always have it stocked in your medicine cabinet, cleaning closet, with your toiletries and your condiments.
23. Balance your entire inner body system.
“The body constantly strives to achieve a state of equilibrium. Apple cider vinegar helps the body maintain a healthy alkaline pH level. Research shows that higher acid levels (lower pH level) leads to a lack of energy and higher incidences of infection.”
Now that you know how many benefits of apple cider vinegar there are, be sure to pick up your own bottle! Start using apple cider vinegar to treat just about anything, and enjoy the natural, practical, and homesteading apple cider vinegar uses. How will you use yours? Buy your own bottle of Bragg Apple Cider Vinegar here.
<br />
Check out this Apple Cider Vinegar infographic by our friends at Fix.com, to sum things up…
 A Chinese billionaire and whistleblower who lives in U.S. exile says Wuhan crematoriums have burned 50,000 coronavirus victims. | Credit: Chinatopix via AP


 Benefits of Apple Cider Vinegar | Home Remedies & Apple Cider Vinegar Uses


 report this ad
