Every prepper knows it’s a great idea to stockpile ammunition when preparing for a major disaster. You can use it for hunting, self-defense, or barter. But which types of ammo should you stockpile? If you plan on bartering, then you don’t want a bunch of calibers that nobody wants. And that’s just one consideration.
In this video, Reality Survival & Prepping talks about what he thinks are the 5 best types of ammunition to stockpile for a collapse.
Here are his picks:
.22 LR – Very common, good for hunting small game, very light and small.
9mm Luger – Great for self-defense, fits in a wide variety of handguns.
5.56×45mm or .223 Remington – Also very common, cheap and effective.
.308 Winchester – Widely used, works in AR10 and bolt-action platforms.
12 Gauge – You can do a lot with it — hunt, defend yourself, etc.
In the video below he makes a much more detailed case for each caliber. What do you think of this list?
This article first appeared on urbansurvivalsite.com See it here
Learning How to Make a Spear Is a Must for Survivalists
Whether you’re in an authentic survival scenario or just up at the lake for a weekend camping trip, you’ve got to eat. But what if your food supplies are running low, or worse, you never had any, to begin with?
That's when knowing how to make a spear comes in handy. Here, we’re going to show you how to make a hunting spear from wood.
We’ll also offer some basic fire-hardening techniques to prolong the life of your spear. Stick around to the end to learn the most effective way to make this multifunctional, primitive hunting tool.
Along the way, we’ll pass on some important safety warnings and tips. Before you get started, here are a few things you'll need:
1. Spear Pole
|
We recommend a small, green sapling approximately 2 – 2.5 inches in diameter, and a few inches taller than you are. (We'll tell you why later.)
Tip: When choosing a tree for your spear pole, choose as straight a sapling as possible. We recommend hardwoods such as hickory, oak or maple.
Hardwood works best as a baton. This is essentially an improvised hammer and will serve to help provide an effective downward force to split your spear into segments without breaking it.
These can easily be found on the forest floor or you could even use a leftover piece of your sapling if it's thick enough. Make sure it is not rotten, as a rotten log will simply fall apart.
You can easily tell if the baton is rotten with a few quick, solid thumps against a tree stump. If it doesn't shatter, you should be good to go!
Paracord is my cordage of choice due to its strength, durability, and resistance to rot in damp conditions, but any cordage can work in a pinch (Even your shoelaces)!
Tip: You can never have enough cordage in a survival situation… you might just be surprised at how many different uses you can find for it!
|
A strong serrated knife will work… but having a pocket folding saw will save you a ton of time, work and hassle! Another secondary option would be a pocket chainsaw or even a wire saw.
In my opinion, however, no good survival or camping kit is complete without a folding pocket saw. Here's a good one to grab.
Once you’ve cut your pole, saw off the fat end to make the surface flat and even. Take your cordage and wrap the pole about 10 inches below the working end.
This will help keep the pole from splitting out once you begin the batoning process.
WARNING: Make sure your spear stands at least as tall as you do. This will help ensure the sharpened points of your spear are above eye level, just in case you take a fall while out on the hunt.
Step 2. Split and Sharpen the Working End of Your Spear
Once you’ve wrapped the working end of the spear with cordage, butt the opposing end up against a tree or stump to help stabilize it. Slowly baton 8-10 inches straight down.
Turn your knife perpendicular to the first split and repeat the batoning process.
Next, find a couple of three-inch sticks about the diameter of a pencil and slide them firmly in place between the splits to keep the spear points expanded. With your knife, sharpen each of the four points.
Step 3. Harden the Spear's Points with Fire
Once the points are sharp, remove the cordage and place the sharpened points below the coals of a fire for 10-15 minutes. This speed dries or “fire-hardens” the wood.
Tip:Be mindful of your spear during this process; check it often to make sure it’s only drying and not burning.
Side Note: An alternative drying technique is to hold the spear just above the flames of your fire like a marshmallow so the flames lick the points of the spear.
While this technique may take longer, it’s easier to keep an eye on the spear points to make sure they aren’t burning.
Step 4. Reinforce the Spear
Once the spear is removed from the fire and allowed to cool, latch the three-inch wooden pegs in place to reinforce the spear during impact. Align your cordage vertically against the shaft of the spear and create a loop.
Next, wrap cordage around the shaft while alternating over and under the wooden pegs.
Step 5. Finishing Touches
After two or three times around, slip the working end of your cordage through the loop you created earlier, and give a stout tug on the other end. When done correctly, this will tighten the pegs up nicely and leave you with a durable, four-prong spear point.
You can also opt to sharpen the other end of the spear into a single, fire-hardened point for self-defense against potential predators.
Watch this video from AVmake for an alternative which is how to make a spear for fishing out of bamboo:
There you have it, survivalists! A sturdy spear good for self-defense and harvesting small game and fish. Your DIY survival spear will work great to take down small game and fish, but when it comes to larger game you'll need a more heavy-duty weapon.
What do you think of our tutorial on how to make a wooden spear? Sound off in the comments section below!
Want to know how to do natural highlights at home? If you want to know how to highlight hair naturally, then try these hair highlight ideas.
DIY Natural Highlights at Home
Is your hair single toned, and you’d like to spice up your image by dying your hair in highlights? If yes, scroll through this page and discover the possibilities on ways to dye your hair naturally!
All are very easy and cheap! Try these DIY highlights today!
Lemon Juice
No, forget the bottled stuff! Even if it’s organic, juice from freshly cut lemons always works better.
Dilute 2 tablespoons of fresh lemon juice with 1/4 of a tablespoon of water from the tap. Then, take a cotton ball, dip it in the solution, take a strand of hair, and slide the soaked cotton ball through it. Continue doing this to several strands of hair, spacing them evenly.
Now, go under the sun, until your hair completely dries.
Chamomile Tea
Brew a cup of natural chamomile tea, and once it cools, either poor it all over your hair, or just like with the lemon juice, simply apply to separate strands of hair.
Next, sit outside, under the sun until your hair dries.
Baking Soda
Mix baking soda with just enough water until that it becomes a paste. Apply to hair, leave it on for half an hour (or longer, depending on the shade of the highlight you prefer), and then wash it out.
Apple Cider Vinegar
This method will leave your hair with a natural reddish color.
Mix ACV and tap water 50/50, and apply onto your hair just as you would with the chamomile tea.
Salt
Remember how the ocean water lightens your hair? Salt does the trick!
Mix 1/2 tablespoon salt with 1 cup of water, and apply to hair. Go out under the sun, and after half an hour wash it all off.
Honey And Olive Oil
This method will slightly lighten your hair, leaving it nice and smooth.
Mix 1/4 cup of olive oil with 1/4 cup honey. Mix well, and apply to your hair. Leave on for an hour, and then wash out thoroughly.
Enjoy your natural highlights!
Want to see honey in action? Then watch this video tutorial from AndreasChoice:
What do you think of these natural hair highlight ideas? Let us know in the comments section what your thoughts are on how to do DIY hair highlights at home. Which one will you try?
Let's say you got lost in the wild, and you somehow forgot or lost your Cold Steel Leatherneck Tanto 39LSFT (or whichever is the best survival knife for you). What do you do?
While your situation is most likely not quite as bad as Tom Hanks had it in Castaway, let's face it. The only way you're gonna get out of this situation in good shape is to let out your inner caveman.
Let me explain. Our very primitive ancestors lived in a time when every day was a survival situation. Any tools or weapons they needed had to be made from scratch.
So, should you be unlucky enough to have only the shirt on your back while you're lost in the wilderness, you'll have to follow suit. Let the training of your inner caveman begin.
Today's lesson: how to make DIY weapons in the wild with only the resources nature provided you.
How to Make a Knife | Homemade Weapons
Having a knife, any kind of knife is probably one of the best things to happen should you suddenly find yourself in a survival situation. You can use it to help you find food, build a shelter, and defend yourself against wild animals.
So it's highly fortunate nature is waiting like a momma at a craft table with lots of materials you can use to create one.
1. Stone Knives
Bone, shell, bamboo, wood, or even an old aluminum beer can may work to perform the puncturing function of a blade. You know you've seen these a million times when you're out hiking.
They're easy to crack or break or shape into a fairly sharp point which will do in a pinch. Unfortunately, you're not going to be able to use a chicken bone or an expertly-shaped aluminum can point to skin, chop, baton, or any of the other necessary functions of a survival knife.
This is where the stone comes into play. I'll start by saying making a knife out of stone isn't easy, but it can be done.
You'll need three things: a core rock, a hammerstone, and a pressure flaker. Remember, you're going to be smashing these together in true caveman fashion.
So, having stones you can reasonably grip in each hand is going to make your life a lot easier. Although, it's definitely an option to stand poised over one rock smashing down on it.
You, with a two-hand grip, pounding until you've chipped away at it a bit. But I'm getting ahead of myself.
2. The Core Rock
The core rock is what you'll be making into a blade. Find any large stone, preferably made from obsidian, slate, chert, or flint with a relatively flat side.
In case you weren't a rock collector in any of your previous lives, here's another way to decide if a rock meets the requirements for good knife-making material. Tap or click a rock together with another rock and listen for a ringing sound (like glass).
The more rock sounds like glass, the better it is as a material for your core rock. If you can, choose a rock which is already a bit sharp to reduce the amount of time you'll need to shape it.
3. The Hammerstone
The hammerstone is a medium-sized, spherical rock, preferably made of granite. It will be used to smash, chisel, chip and shape the core rock.
You'll be using it to chip off pieces of the core stone and to narrow the edges to a blade shape.
The pressure flaker, or flaking tool, is a rock with a sharp point to help you refine the blade's edges. You'll use your flaking tool after you've thinned the edges of the stone with the hammer stone to make the “blade” sharper.
When you start making your knife, you'll want to be sure to wet the core stone to shorten the time it takes to shape it into a blade. Begin by striking glancing blows near the edge of the core rock with the hammerstone.
Chip away at the core rock until you get the general shape of a blade. Then, use the flaking tool to refine the edges you need to sharpen.
You can also use a stone with a rough surface such as a sandstone to sharpen the edge. Use some rope, cloth, or leather to lash the base and create a handle.
If you are having troubling shaping the rock into a knife, you can opt to create stone blades instead. Check out the videos below to learn how:
Part One:
Part Two:
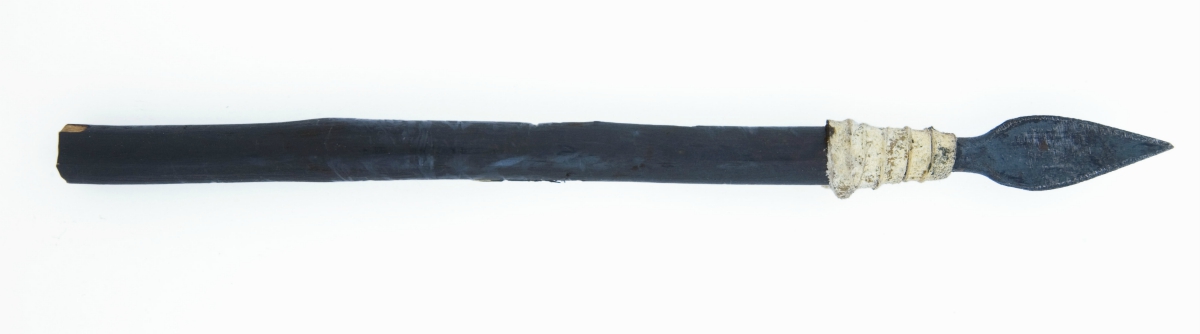
How to Make a Spear | Homemade Weapons
We've talked about how to make a spear using your best survival knife in a previous article. The same principle applies here.
Even without your Cold Steel Leatherneck Tanto 39LSFT or whichever survival knife you normally bring with you, you can still make a spear using your newly made stone knife. To make a spear, you'll need to find a five-foot-long stick tough enough to endure repeated short or long-distance throws.
First, pick the end of the stick which has a more rounded tip and use your stone knife to start shaving to create a spear. Once you're done, be sure to heat the spear over some hot coals to make your spear sharper.
As an alternative, you can also make a spear by tying your knife onto a stick. Find a stick which is about an inch wide.
Measure about 2 inches from one end of the stick. Mark the point, then split the stick into two until you reach the 2-inch mark, creating a sort of Y shape.
This will create a space where you can stick your stone knife before you lash it on with some twine, cord, or rope. To lock the blade in place, put some moss or lichen in the remaining space.
If you haven't had time to fashion your knife out of stone yet, you can also use broken pieces of shell or glass or splintered bamboo or bone and secure it to the end of your stick.
If you find a way to split your stick without a knife, you can insert the splintered bone or bamboo into the wedge and tie it off like you would when turning a knife into a spear.
How to Make a Weighted Club | Homemade Weapons
While sharp pointy tools are all well and good, you can never go wrong with a blunt homemade weapon. You can use it for hammering or bludgeoning something such as a weighted club.
The weighted club could be one of the deadliest ancient weapons. To make one, you'll need the following: a piece of wood around 14-16 inches, a medium-sized rock, and some rope.
Once you have all the materials, you'll need to wrap some lashing 6-8 inches from the end of the stick.
Split the same end until you reach the lashing in order to create a V-shaped notch. The rock you picked out should be shorter than the length of the split.
Insert the stone then lash it securely (above, below, and across the stone). The lashing on the stick above the stone clamps both sides of the split together providing the first point of security, so it's especially important to create a good, tight lashing above the stone.
You'll want to make sure you bind the split ends securely so the stone won't fall off whenever you use it to hammer or pound on something.
This video from Wannabe Bushcrafter will show you how to make a bamboo knife:
Now, hopefully, you never find yourself in a situation where making homemade weapons is going to be a necessity for survival. But, if you do find yourself in such a quagmire, this little bit of information and inner caveman training may be what saves your life.
Which of these homemade weapons do you want to make? Tell us your progress in the comments section below!
Apple cider vinegar benefits the body, internally and externally. There are many home remedies and apple cider vinegar uses that you can do to combat odors, ailments, and more! Keep reading to learn all the benefits of apple cider vinegar. Stay tuned and learn to make your own.
Benefits of Apple Cider Vinegar | Home Remedies & Apple Cider Vinegar Uses
By Tara Pelette
A product that can be used as an ingredient in food, a cleaning product, and to improve your health is a necessity to any homesteader. Not to be mistaken for other beneficial fermented products making their way back into the spotlight, Apple Cider Vinegar’s benefits and variety of uses outshine all of the others.
There has been a lot of buzz around Apple Cider Vinegar in the nutrition, homesteading and environmental communities. I will breakdown why this ingredient commonly used in salad dressings and condiments can be used for more than just food. Anyone close to me can verify that I swear by Apple Cider Vinegar, as it is something I use daily. I believe it will become one of the most important things at your disposal too.
It is very simple in its composition. Apple Cider Vinegar is made from crushed apples that are left to ferment over time. Wise Geek, defines fermentation as, “the conversion of a carbohydrate such as sugar into an acid or an alcohol.” In this case we are looking at Acetic Acid, which is formed through the fermentation process and is the main component of all vinegars. The simplicity and natural processing that takes place in order to produce Apple Cider Vinegar makes this product not harmful for the environment or to you and your loved ones.
“Apple Cider Vinegar contains necessary ingredients, such as enzymes, and life stimulating minerals, mainly potassium, in a natural state,” claims Braggs Live Foods, a brand that makes raw, unpasteurized Apple Cider Vinegar. These enzymes and minerals are present in the vinegar as web-like strands known as the Mother, giving Apple Cider Vinegar its cloudy appearance.
This product is only worth your while in a raw, unpasteurized state, as heat from the process of pasteurization destroys the beneficial enzymes and minerals. The brand I prefer is Braggs as referenced above, but there are many beneficial brands out there! The best way to distinguish a good brand is by ensuring that the Apple Cider Vinegar is unprocessed.
According to Apple-Cider-Benefits.com, “recorded vinegar history starts around 5000 BC.” They state that during this time Babylonians made vinegar to use in food and as a preserving and pickling agent. They also report that vinegar has been found to have been used in Egypt around 3000 BC and in China around 1200 BC.
“In ancient Greece, around 400 BC, Hippocrates, the father of modern medicine, prescribed Apple Cider Vinegar mixed with honey for a variety of ills, including coughs and colds,” a remedy that is still being used today.
They also state that vinegar was used in the military as a “strengthening and energizing tonic,” which also had the benefit of killing any internal infections. In the same way, vinegar was used topically, “to clean and disinfect soldiers’ wounds.”
Apple Cider Vinegar has been used in different cultures through the years and has had its waves of popularity come and go, but its benefits have never changed.
report this ad
Braggs Live Foods claims it to be so beneficial that it, “Helps removes body toxins
Helps promote a healthy body
Helps support a healthy immune system
Helps maintain healthy skin
Helps control weight
Improves digestion and assimilation
Soothes tight aching joints and sore muscles
Soothes irritated skin”
As it is so diverse, healthy and simple, due to its lack of processing it can be a beneficial and permanent addition to your everyday life. Apple Cider Vinegar can be an immune booster, an antiseptic, a facial toner and an all purpose cleaner. Once you try it out I am sure you will always have it stocked in your medicine cabinet, cleaning closet, with your toiletries and your condiments.
23. Balance your entire inner body system.
“The body constantly strives to achieve a state of equilibrium. Apple cider vinegar helps the body maintain a healthy alkaline pH level. Research shows that higher acid levels (lower pH level) leads to a lack of energy and higher incidences of infection.”
Now that you know how many benefits of apple cider vinegar there are, be sure to pick up your own bottle! Start using apple cider vinegar to treat just about anything, and enjoy the natural, practical, and homesteading apple cider vinegar uses. How will you use yours? Buy your own bottle of Bragg Apple Cider Vinegar here.
<br />
Check out this Apple Cider Vinegar infographic by our friends at Fix.com, to sum things up…
It’s inexpensive, easy to store, and you can use it in many survival scenarios. Rubbing alcohol is a powerhouse multi-purpose liquid that you should stock up on for emergencies.
Rubbing alcohol is a mixture of denatured alcohol, water and other agents that are added to make it unpalatable to drink. Although it is usually clear, some rubbing alcohols may contain colorants. Nicknamed “surgical spirit” in the United Kingdom, rubbing alcohol has a strong smell that is similar to fingernail polish remover.
The rubbing alcohol commonly sold in grocery stores and pharmacies in the U.S. comes in two grades — 70 percent isopropyl alcohol and 90 percent isopropyl alcohol. The 90 percent solution has a lower water content and is a bit more expensive.
The 70 percent solution has higher water content and is gentler on skin. You can find the 70 percent solution at the dollar store in the first-aid section. (Both types work well for the uses we have listed in this article.)
Rubbing alcohol is a common ingredient in hand sanitizers, paint thinner, antifreeze, household cleaners, and some personal care products. All rubbing alcohols are unsafe for human consumption. In fact, the term “rubbing alcohol” came into use during the Prohibition era to emphasize its use as a liniment for massage and to distinguish it from other forms of alcohol.
Now let’s look at some of the ways rubbing alcohol can help you in a survival situation.
1. Disinfectant – You can use rubbing alcohol to clean and disinfect non-porous surfaces such as cooking surfaces and cooking utensils when hot water and soap is not available. Apply the solution as a disinfectant and then allow it to dry.
2. First Aid – You also can use rubbing alcohol to sanitize tweezers and other first aid equipment and to clean minor cuts and scrapes. (Do not use rubbing alcohol for mouth wounds or deep skin wounds.)
3. Foot and Nail Fungus – Rubbing alcohol can kill the fungus that causes athlete’s foot and nail fungus. Mix together equal parts of rubbing alcohol and water and then apply on the affected area with a cotton ball several times a day to kill the fungus and to help prevent infection. You also can rub the feet each night with rubbing alcohol to help prevent fungal infection. A bonus is that the solution also kills the bacteria that cause foot odor.
4. Fire Starter – Rubbing alcohol is highly flammable and can serve as a fire starter in a survival situation. Squirt or spray small amounts on wood before lighting. If you have rubbing alcohol pads in your first aid kit, you can use these as handy fire accelerants.
5. Tick Removal – You can get ticks to unlatch themselves for easier removal with rubbing alcohol. Soak a cotton ball with rubbing alcohol and place it directly on the tick. When the tick releases its grasp, carefully remove it with tweezers.
6. Ice Packs – You can make your own frozen packs with rubbing alcohol. Here’s how. Mix together three parts water with one part rubbing alcohol. Pour the solution in a zippered bag and freeze for three hours. These squishy cold packs will bend and shape around an arm or a leg to reduce pain and swelling. The packs are reusable. 7. Cold Sore Treatment – Apply rubbing alcohol to painful cold sore with a cotton swab. Its antiseptic properties help the cold sore to dry out and heal. (Please note: The rubbing alcohol will sting a bit, and be sure to apply it externally only.)
8. Kill Pests – You can kill many insects by spraying them with rubbing alcohol. Be sure to avoid your stove, and any open flames when spraying since rubbing alcohol is flammable.
Aphids. Combine two parts rubbing alcohol with five parts water along with one tablespoon of dishwashing liquid. Spray directly on plants that are under attack from aphids. Repeat in a few days if needed.
Bed bugs. Spray rubbing alcohol on mattress and box springs to kill bedbugs on contact. Avoid spraying wood furniture.
Head lice. Use rubbing alcohol to sanitize your comb as you continue to remove nits.
Fruit flies and gnats. You can kill fruit flies and gnats by spraying them with rubbing alcohol. Be careful to avoid spraying any fruit you want to eat.
9. Soothe Insect Bites and Stings – Rubbing alcohol soothes skin and relieves itching from bites and stings. It also helps promote healing by drying out the skin.
10. Ease The Pain of Rashes and Burns – Similarly, an application of rubbing alcohol can help provide relief from rashes associated with poison oak, poison ivy and sumac. It also can help prevent infections that may result from these rashes.
11. Get Rid of Grease and Residue – Rubbing alcohol helps remove greasy, sticky and oily substances from pots and pans and surfaces when water is scarce.
12. Soothe Joints and Muscles – Let’s not forget the word “rubbing” as we discuss the uses for rubbing alcohol. The stress and physical labor involved with a survival scenario can lead to painful muscles and joints. Massaging rubbing alcohol into the skin increases blood flow and soothes discomfort. (Do not use on babies or young children.)
13. Hand Sanitizer – Rubbing alcohol is the main ingredient in most store-bought hand sanitizers. You can make your own version with rubbing alcohol, aloe Vera gel and if you’d like, a bit of essential oil. Here is the recipe.
2/3 cup rubbing alcohol
1/3 cup aloe Vera gel
10 drops essential oil (such as lavender)
Massage the resulting gel into your hands and fingers just as you would with commercial hand sanitizer but without any of the usually added chemicals. Keeping your hands clean will help prevent illness and infection during an emergency.
14. Prevent and Treat an Ear Infection – When water pools in the inner ear, it can lead to the painful infection commonly known as swimmer’s ear. Placing a few drops of rubbing alcohol on a cotton ball and placing it just inside your ear may help dry out the affected area. Another option is to moisten a cotton swab with a mixture of rubbing alcohol and white vinegar. Gently swab the area.
Here is a recipe for swimmer’s ear drops. Mix two tablespoons of rubbing alcohol with two tablespoons of white vinegar. Use an eyedropper to place two to three drops in the ear. (Use sparingly. Rubbing alcohol can cause dryness and irritation if you overdo it.)
15. Defroster – You can use a rubbing alcohol solution to defrost car windows when you need to get going in a hurry. Keep a spray bottle filled with a mixture of one part rubbing alcohol and five parts water in your car. It won’t freeze, and you can use it to mist your windows before wiping away melted ice.
By now, you see the advantages of having a large supply of rubbing alcohol on hand as part of your emergency preparedness. The amazing product also is useful in many non-emergency situations.
Use As Deodorant – Dab a cotton ball dipped in rubbing alcohol on your armpits to clean away and kill bacteria that can cause underarm odor. (Caution — rubbing alcohol can sting recently shaved underarms.)
Clean Mirrors and Windows – Rubbing alcohol is great at removing fingerprints and residue from glass. You can use it to clean your eyeglasses too.
Remove Laundry Stains – Pre-treat ink and marker stains in clothing with rubbing alcohol before laundering.
Marker Removal – Rubbing alcohol safely removes permanent marker from many hard surfaces.
Clean Granite Counters – Use rubbing alcohol to clean your granite kitchen counters safely.
Remove Sticker Residue – Remove the annoying remnants of adhesive from stickers with a cloth moistened with rubbing alcohol.
Disinfect Electronics – Apply a small amount of rubbing alcohol to a cotton swab to safely clean your phone, keyboard or computer mouse. It evaporates quickly, so you don’t have to worry about liquid damage.
Deodorize Smelly Shoes – Spritz the inside of smelly footwear with rubbing alcohol and leave them out in the sunshine to dry. The rubbing alcohol and the sunlight combine to kill the germs that are causing bad odors.
Clean Sinks – Rubbing alcohol cleans and disinfects kitchen and bathroom sinks. It also is safe to use on chrome and brass.
Deep Clean a Dry Erase Board – Get rid of lingering shadows from dry-erase markers by cleaning your whiteboard periodically with rubbing alcohol.
Clean Microfiber Furniture – Water can stain microfiber, but rubbing alcohol does not penetrate the fabric, and it evaporates quickly. Spray rubbing alcohol on the stain and then wipe clean with a white cloth. Allow the area to dry. If the microfiber seems matted, brush the area in a circular motion using a soft brush.
Refresh Sponges and Cleaning Clothes – Use rubbing alcohol to get rid of the bacteria that can cause sponges and cleaning cloths to smell rancid. Place the sponge or cloth in a small bowl filled with rubbing alcohol, allowing it to remain there for 15 minutes. Then rinse well with water.
Wipe Down Stainless Steel Appliances – Spray some rubbing alcohol onto a soft cloth for a streak-free and gentle way of cleaning your stainless-steel kitchen appliances.
Rubbing alcohol also comes in a 99 percent variety. It is extremely flammable and is mostly used for research and industrial work. Because it is toxic if swallowed, be sure to keep all forms of rubbing alcohol away from babies and young children.
Disaster strikes and survival mode sets in. This is scary enough, but being diabetic and trying to live through a survival situation is can be even scarier without some extra preparation.
Here are some tips that will help you get started in your extra prep stages:
Insulin
Our first tip is to split your insulin between as many bags as possible so the loss of a bag isn't a life or death situation. Packing your insulin safely is important. Bubble wrap may be a great way of protecting your insulin. Find something lightweight that won’t take up a ton of extra space in your bag.
If your survival situation includes travel, you will face the dilemma of keeping your insulin at the proper temperature. You can improvise by wrapping insulin in something damp or placing it in flowing water. However, do not allow your insulin to become so cold that it freezes.
Remember, if your insulin breaks or if you run out, then you need to drink a lot of water to prevent ketoacidosis.
Nutrition
The most important item for a diabetic is food. Pack low density snacks and meals such as energy bars. These bars are lightweight and usually pack the right balance of carbs, protein and sugar.
Avoid very sugary survival food or food high in carbs. If you find yourself low on prepared food, then you may want to learn to make your own granola. It’s inexpensive and will keep you going in a survival situation. Keep the bulk ingredients as part of your prepper supply.
Another great food option is beans. They are high fiber and packed with protein and vitamins. Plus, they are so high in fiber, they slow down other carbs in your body as well.
One more item you should always have in your survival bag is a supply of nuts and seeds. They are packed with protein and omega 3s. These work to keep your blood sugar low.
The right vitamins may also do the trick when need a boost. One vitamin some doctors suggest is Chromium. Chromium is found in some vegetables, meats and whole grains. It has been shown to cause a boost in insulin production which can be crucial in a survival situation.
Be sure to monitor your energy levels
Remember not to push yourself too much because you want to keep as much energy as you can so you are ready to handle whatever comes up in your survival situation.
If you are not in a survival situation, but simply spending time in the wilderness, be sure to register with the park office. Our National Parks have a simple registration process with rangers that can be a lifesaver. You’ll outline your patch and time planned in the park. Don’t forget to mention that you are diabetic.
As a diabetic, it is wise to never hike more than 6 hours from civilization in order to access medical help in a timely manner if needed.
Being in a survival situation is tough enough. These survival preparedness tips for diabetics can make the survival prep easier.
If you are diabetics and have found some great survival tips, we want to hear from you. Comment below to let us know what you do when you are camping or how you’ve prepped for survival situations…
Ever think while you’re renovating “how funny it would be if I came across a treasure map beneath the foundation of my house.” But no, that never actually happens!
It did for this couple!…
Arizona Couple Discovers Buried Treasure With 50k Cash, Rare Bourbon, and A Mysterious Treasure Map
Eddie and Angie of Pheonix, Arizona were renovating the kitchen island of the fixer-upper they’d been living in for just 2 years, when they discovered A SECRET SAFE!
Good thing Angie remembered finding a mysterious code on a piece of paper in her medicine cabinet 2 years prior upon moving in. She had kept it all these years, because “you never know.”
World War II and the holocaust serve as terrifying reminders of how ethnic persecution and totalitarian regimes can lead to some of the worst atrocities humans are capable of.
Each theatre of the war and each city occupied present their own collection of horrors, heroes, and stories that we should strive to remember and learn from. It is from learning these lessons and using them that we can best honor those who lost their lives.
One of the most terrifying and inspiring accounts from this era is the story of the Jews and their survival and resistance under the Nazis. From the Warsaw ghetto to the forests of Eastern Europe, stories abound of hope and defiance against all conceivable odds.
But before the famous uprisings or terrifying removals to the camps, thousands of Jewish survivors in the ghettos struggled through harsh winters and hostile forces to survive in a dense urban environment.
We can learn a lot by looking at how. We are going to focus on their struggle for food, sanitation, and warmth. By doing so, we may better understand the realities of urban survival in the worst possible scenarios.
We will also briefly touch on the resistance – which can be informative for various urban self-defense scenarios.
As World War II raged, the Germans began to construct over a thousand ghettos that were separated from their surrounding city by walls, guards, and barbed wire. The size of each ghetto varied, but they all suffered from horrendous conditions that progressively worsened over time. Poor clothing, starvation, and death from the elements were common.
On average, over 3 people (up to 8 in some places) occupied each livable room with less than 50 square feet per person. In the Warsaw ghetto, the Jewish population was around 30% of the city but they were limited to an area of around 2.4% of the total municipal area.
The Germans installed local Jewish councils to collect taxes and to manage the labor teams for the German factories. The stories and nuances involved in the politics of these councils would require a whole post in itself.
Suffice to say, they were a council of the local Jewish leaders responsible for keeping order in the Ghetto—they had varying degrees of success and autonomy depending on the ghetto you are examining.
Jewish Women in Occupied Lublin
Since most residents had been forcibly moved to the area with minimal belongings, they were subjected to mass cases of instant poverty and great social disadvantage. Only a small percentage of the ghetto population had any form of regular work. Street trading became common and almost anything could become an item of exchange.
Most of life struggled to continue with children attending illegal schools and making toys out of scrap material, such as turning the tops of empty cigarette boxes into playing cards.
Warsaw Ghetto Market
Between October 1940 and July 1942, around 92,000 Jewish residents of the Warsaw ghetto died of diseases, cold, or starvation. These deaths accounted for nearly 20% of the entire pre-war population.
The Jewish Ghettos also provide a grim reminder of the desperate need for food in an environment where growing food is impossible and leaving the urban area for extended periods is too dangerous.
While the Nazis promised some rations, in most cases they were purposely starvation rations. In many ghettos, a Jewish inhabitant was only allotted 300 calories of food per day. Obviously, this is not enough to live, let alone work on.
Many without the means to trade for food starved. Hundreds and thousands starved. The families that didn’t starve were the ones able to perform some trade or service in exchange for food. The food came from smugglers who would make dangerous runs into the local territory. Without the ability to farm, these smuggling runs to trade or steal became one of the only sources of food.
One diarist, Chaim A, Kaplan, who perished in the liquidation of the Warsaw Ghetto, recorded:
Smuggling was carried out through all the holes and cracks in the walls, through connecting tunnels in the cellars of buildings on the border, and through all the hidden places unfamiliar to the conqueror’s foreign eyes … trolleys make no stops inside the ghetto, but that’s not a handicap. The smuggled sack is thrown out at an appointed spot and caught by trustworthy hands. This is the way they smuggled in pork fat, in particular, which the religious leaders have permitted us to use in the time of destruction.”
The smuggling would also extend to winter clothes, medicine, and eventually, weapons.
Warsaw Ghetto Smuggling Food
In the Vilna Ghetto, they were more industrious than most. The Vilna ghetto had a large population of pre-war doctors and a strong central community keeping the people together. They were able to manufacture vitamins to supplement their food with waste and by-products from the local brewery.
Amongst what they produced was Vitamins B1, D, and iodine. Calcium and phosphorus preparations “ghetto phosphatin” were made from the horse bones. This community saw much better results than those that lacked the same level of organization and forethought.
The Lesson Here About Food and Nutrition:
The lessons to take away here are that you need to stock up on food and have a method with which to barter for more. You never know how long after SHTF you will need to be entirely self-sustaining.
You should also have a plan for creating, offering, or collecting something that you can barter for more food. Tools out of scrap metal, mechanical repairs, medical services, etc. Lastly, it should be noted that even things you may consider ‘waste’ can be used to supplement your nutrition.
Learn to make your own vitamins, learn to reuse the things you use on a daily basis too. Learn to use the whole buffalo, so to speak; all that is available to you in your survival environment. It may not seem appetizing, but you need to be able to operate at full strength to make the best of your situation.
This also shows that if you can produce food, you may have an incredibly valuable commodity to trade. It is possible to raise animals for food in the city, as well as forage.
Maintaining Sanitation
In the dense environments where water, food, shelter, and medicine were scarce, the sanitation was horrendous. In places like the Vilna ghetto, they were able to enact strict sanitation laws where residents were made to cut their hair and their clothes on a regular basis.
The rampant diseases in a population that dense meant that sanitation was the only thing preventing them all from becoming sick and perishing. Areas where residents failed to maintain some semblance of sanitary conditions were ravaged by disease.
Few areas had access to clean water and electricity. This made cleaning yourself and washing your clothes with hot water near impossible. This led to the creation of “tea houses” like in traditional Chinese cities. In these places, some people were dedicated to providing hot water and washing clothes for a nominal fee or trade. Steam from one of these facilities was even used to heat some other communal rooms.
Warsaw Ghetto – Transfer of Dead
Another issue was waste disposal. Bodies and other forms of waste began to pile up. Some communities made a deal with the local farms so that the farms would use this waste as manure and cattle feed. In January of 1943 alone it is said that 518 wagon loads of waste were removed from the Vilna ghetto.
As a side note: They didn’t have the same type of garbage we do today, and this problem will likely be much worse for us due to the inorganic and plastic nature of our modern waste.
The Lesson Here About Sanitation:
This is something often overlooked by urban survivalists but is your greatest tool against a killer you will likely face: disease. Have a plan for having hot water and for disposing of your waste. You can’t rely on an organized community doing it for you like in these cases.
This isn’t my specialty, but there is a lot of information out there about how to live a low waste lifestyle and how to recycle most things you use. Though this is currently more an arena of environmentalists and conservationists, these methods can be absolutely necessary for survival when the SHTF. You should also learn to upcycle.
Surviving the Winter
During the winters, maintaining heat was a constant struggle and cold became the greatest killer in the ghetto. The winter of 1942 was severe and the Nazis decided to use it at the Drohobycz ghetto as an extermination method. The food rations were cut even smaller and no coal was provided to heat the homes. In the following days, many found what they could from inside their homes to destroy and set on fire.
Eventually, even all the wooden fences had been used for kindling. Clothing was another issue as well. Exchanging clothes for food became a balancing issue for many. Starvation versus freezing to death was a decision many were forced to make. Thousands died from exposure to the cold.
The Lesson Here About Winter:
Have a plan to stay warm. You will eventually run out of things in your area to burn so have a more sustainable plan. We have a wide array of other articles detailing ways of staying warm and even one on building a solar-powered furnace.
Also, ensure you have enough food so you aren’t forced to trade away your warm clothes in order to eat. Obviously, some environments are more prone to this issue than others. I’m sure you are in no fear of freezing to death down in San Diego.
Fighting Back
On 22 July 1942, the Warsaw Jewish council was informed that “all Jewish persons living in the Warsaw Ghetto, regardless of age and gender, would be resettled in the East.” They all knew by this time what that meant. They were going to a death camp. Rather than go peacefully, they began to erect barricades and stockpile weapons (in reality, these defensive preparations had been in the works for a while).
While the members of the resistance lacked adequate military training and possessed few weapons, they made an effective network of tunnels and hodge-podge bunkers.
When the German columns of tanks and soldiers first started to move into the intersections, the Jewish resisters rained down Molotov cocktails, grenades, and bullets. The barricades were able to prevent the movement of the tanks, and the Germans were forced to fight room by room, door by door. The Jewish fighters would rain down gunfire and Molotovs in an ambush then quickly melt away into the booby-trapped buildings.
In Warsaw, the Germans were forced to use flamethrowers to burn the buildings down block by block and to blow up the sewers entirely.
[they] were beaten by the flames, not the Germans; there was no air, only black, choking smoke and heavy burning heat radiating from the red-hot walls, from the glowing stone stairs.”
Warsaw Ghetto Uprising
The Lesson Here for Fighting in an Urban Environment:
While you may not need to be fighting back against any large occupying force, you will need to be able to defend your home. The first lesson here which we already covered is your physical condition. You can’t fight back if you are weak from hunger or suffering from hypothermia. The first step in combat is being able to fight.
Secondly is have a supply of weapons and tactics effective for your scenario or situation. Machine guns cover roads, Molotovs can be dropped, booby-trap doors, etc. Have multiple escape routes mapped and planned.
This shows the tactical advantage you can have defending yourself against even the largest and best trained military forces. It also shows they may resort to trying to burn you out.
The wilderness can be an exciting place, but also a very dangerous place considering there are poisonous plants all around us.
Let’s dive into some of those poisons so you can stay safe while camping, hunting our enjoying the outdoors with your family.
The number one mistake people make, and the most common cause of people being poisoned by plants is by eating plants they think are safe for consumption.
Plants generally poison by:
Ingestion
Contact
Absorption or inhalation
Plant poisoning can range from minor irritation to death.
Some wild plants require contact with a large amount before noticing any adverse reaction, while others may cause death with only a small amount of contact.
Every person has a different level of resistance to toxic substances. While some people can have an immediate reaction, some people may take longer to see the dangerous effects that a plant or poison had on them.
Beware of the Top Poisons
Before we get started, try compiling a list of camping hacks to make your next stay in the wilderness most comfortable. Once you’re packed and ready, study the following plants you must avoid:
The Water Hemlock
This innocent looking, but very dangerous poisonous plant, scientifically known as the Cicuta, is a poisonous plant from Apiaceae family. Cicuta is one of the most poisonous plants on the continent as it contains cicutoxin, a toxic component that causes stimulatory effects to the central nervous system leading to seizure when ingested.
The poisoning caused by the water hemlock can be treated medically through the administration of activated charcoal that reduces the absorption of the toxic component.
The Daphne
These plants are famous for their poisonous berries and scented flowers. Many species are cultivated as gardens for their ornamental use. Their berries, bark, and sap contain toxins that cause skin irritation.
The Poison Oak
This common poison is a woody shrub mostly found in western North America. The twigs and leaves of this plant have oil on their surface that causes allergic reactions. Contact with the leaves or twigs causes itching that evolves to dermatitis. This leads to inflammation and the formation of blisters. A lot of people find this in the wilderness and think it may be great for starting fires, but when burned, poison oak also emits poisonous smoke.
The American Pokeweed
This Pokeweed is an herbaceous plant that grows to about 2 m in height. It is native to the United States and Canada in Ontario and Quebec. It’s very important to realize that all parts of the American Pokeweed are poisonous and can cause vomiting, seizures, and convulsions.
As the Pokeweed plant matures, the toxic level also increases and should be avoided during pregnancy. Children can be severely harmed if they consume even one berry. For sensitive people, the plant can cause dermatitis. Animals and birds are immune to the poison of this plant. In case it is taken accidentally, one should seek treatment or call a poison hotline.
Unfortunately poisons in the wilderness don’t stop there, but this provides a foundation that may be the difference between a safe wilderness adventure and a trip to the hospital from a severe reaction.
If you plan on cooking your favorite camping recipes and they call for some kind of berries, make sure you bring your own if you are not completely sure of the difference between safe and poisonous wild berries.
Have you encountered some poisons in the wilderness that we didn’t mention today? Let us know in your comments below so we can help keep each other safe.
Want to know how to make your own herbal poultice? If you need some homemade herbal remedies for your aches and pains, try this.
How to Make Herbal Poultice
Do you have any memories as a child when your mother used to put mashed herbs on your wound or sprain? If you have then I’m sure you’re wondering how it works and how it was done. Maybe I’m the odd one out, but when I was a child I was so intrigued, and I learned all there is to know about herbal poultices.
A poultice is a healing remedy for sprains or wounds that comes from herb oil and natural ingredients that you can find at home. Learn how to make them, and use them. This tutorial will teach you some survival 101
Find out how you can make a Comfrey Poultice with this DIY tutorial!
Comfrey is known for it’s healing and cell-regeneration qualities. Do not ingest comfrey, it is toxic to the liver. Read more facts here.
Here’s what you’ll need to make a Poultice
Dried Comfrey Leaves (or other herbs of your choosing)
Lavender Flower Powder
Organic Muslin Bag
Spoon
Hand Blender
1. Cook and soften the herb.
Place a quarter of a small muslin bag of comfrey into a pan. Add water just enough to soften the comfrey and heat the mixture.
2. Blend and Mix.
Add lavender flower powder and hand blend it until it gets pasty.
3. Stuff and Use.
Stuff the muslin bag with the mixture and it is ready to use!
Want to see how to make your own poultice at home? Then watch this video tutorial from Cat the HerbalPrepper:
What do you think of this tutorial on how to make herbal poultice? Will you give it a try? Let us know how it went and share your experience with us in the comment section below.
Have any homesteading projects you’d like to share? Share it with us an we’ll give it a try. We’d love to know what you think!
My friends at Honey Colony are here to share why chemical free sunscreen is the way to go. Seriously. If you’ve been using anything else this article will truly shock you. Don’t worry though, I have a solution – and that is an amazing all natural sunscreen I’ve been using! Keep reading for details.
Is there anything more serene than laying out on a quiet beach under the warm summer sun. Be smart this summer, and choose a sunscreen that will be good for you.
Commercial Sunscreen: Get the Facts Before You Slather It On
Did you know there are over 10,000 chemical compounds used in the personal products industry as a whole, and only 13% of these have been tested for safety. You do the math – that’s 1,300 that have been tested compared to 8,700 that haven’t! Dozens of these untested chemicals are found in ordinary commercial sunscreens. It is essential to get the facts straight before you put any kind of “protection” on your skin – if we can even call it that.
After all, your skin is the largest organ in your body, as well as one of the most important. In addition to the obvious way it protects your internal system from the external environment, it also detects pain, pressure and temperature, helps to regulate internal core temperature, and is the largest organ of elimination you have. That’s right, your skin serves in pushing the bad chemicals OUT
A lot is riding on how resilient your skin stays, so one would think that skin products should be proven safe before they go on the shelves ─ and on to your body.
Sunscreen “Conventional Wisdom”?
The fact that sun overexposure can lead to free radical DNA damage and diseases like cancer is nothing new. Nearly two million Americans are diagnosed with skin cancer each year, according to the Skin Cancer Foundation. Local dermatologist usually tell their patients to apply a “full spectrum” sunblock on a daily basis. This protects people against UVA exposure in particular, which is the real culprit when it comes to cell mutation and DNA damage caused by the sun.
Take a second look before you buy, however. The commercial sunscreen you are about to purchase probably contains chemical compounds that could prove to be far more harmful than any damage the sun could ever do.
The Deadly Effects of Commercial Sunscreens
“During the past 50 years, we have increased the number of synthetic sunscreen chemicals that we use,” says Dr. Peter Dingle in a recent article for the online natural health magazine, Nova.
“We have done this with virtually no consideration of how vulnerable we are to these chemicals─ or how little we know about their subtle and cumulative toxic effects. We assume that because they are so easily purchased from the supermarket shelf, they must be safe to use.”
According to a 2001 research study conducted by the Institute of Toxicology in Zurich, Switzerland, methoxycinnanate, oxybenzone, and benzophenone, synthetic compounds found in many commercial sunscreens, have been linked to the growth of breast cancer in laboratory rats.
A chemical compound called 4 MBC is especially potent as well. In studies conducted by the same entity, when 4 MBC was mixed with olive oil and applied to the skin of rats in the same proportions as common sunscreen, it “doubled the rate of uterine growth well before puberty.”
“Ingesting” any one of the substances listed above through the skin can produce Xeno-estrogens in the body. Xeno-estrogens are endocrine disruptors that aggressively replace naturally-occurring estrogen. When a build-up of these “foreign estrogens” occurs, research has shown that this can lead to cancer tumor growth as well as other hormone-related issues. A daunting study conducted by the U.S. Center for Disease Control found that 97 percent of the individuals tested (ages 6 and up) had oxybenzone in their urine.
report this ad
Who Are You Really Buying Your Sunscreen From?
“Eighty percent of the sunscreen that is sold in this country is made by three companies,” explains Guerry Grune, PhD, creator of 3rd Rock Sunblock, a mineral-based sun protectant and skin strengthener that uses micronized zinc oxide and other food-grade natural ingredients in an alkaline base.
Grune is also an active member of the committee that helped to pass the Sunscreen Innovation Act last November. However, although the committee thought the Act would be a major victory for stricter regulations, it is turning out to be mere lip service on the part of the Obama administration.
“There are about 10 active sunscreens that were supposed to be tested by the FDA that are being used in countries outside the United States,” explains Grune. “Those sunscreens have not been approved by the FDA because they have not been tested … [The Act] was supposed to push along the FDA to get these 10 sunscreens, as well as other new sunscreens, tested so they could protect the public. The FDA … still has done nothing because, even though [the Act] passed, there was no funding attached to it.”
And what of those three companies? Coppertone was recently sold to Bayer (that are known for their bee-killing neonicitinoids). Banana Boat,which is owned by Playtex (the same company that makes Eveready Batteries) and the third company, Neutrogena, despite its “natural” marketing image, is owned by Johnson & Johnson Company since 1995.
With such connections to major drug companies, it’s no surprise that 20 of the 34 sunscreens that made it on to the Environmental Working Group’s “2015 Hall of Shame,” are made by Coppertone, Banana Boat, or Neutrogena.
Alternatives to Toxic Sunscreens
There ARE products out there that actually boost the overall health of the skin while protecting against UVA radiation too. The skin, just like the internal organs, can be effected by overly acidity – which creates the perfect environment for cancer cells to cultivate.
3rd Rock Sunscreen, created by chemical engineer Guerry Grune, PhD, is an example of a product that provides not only protection from UVA exposure, but also creates an alkaline environment that discourages cancer growth as it strengthens the skin overall. This product and others like it are rays of hope in the polluted sea of toxic-laden commercial sunscreens that currently line the shelves.
“If you can’t put it in your mouth, why would you put it on your skin?” Grune says matter-of-factly.
Remember, you need to take care of yourself before you take care of anyone else. (I learned that on the plane – who do they say to put the oxygen mask on first?? Y-O-U!!!) That is also why you need to treat your skin right. Avoid cancer, avoid the sun, and just avoid chemicals. I want you all to live a long healthy life! Please let me know if you’ve ordered this product, and how it has worked for you.


 Benefits of Apple Cider Vinegar | Home Remedies & Apple Cider Vinegar Uses


 report this ad

![Check out The Buried Treasure this Couple Found is UNBELEIVABLE!!! [NEWS] at https://homesteading.com/news-buried-safe-treasure-map/](https://46yxb83hlyy77jig73dh02ok-wpengine.netdna-ssl.com/wp-content/uploads/2015/08/Safe-Story-1-compressor.jpg "Buried Treasure")
![Check out The Buried Treasure this Couple Found is UNBELEIVABLE!!! [NEWS] at https://homesteading.com/news-buried-safe-treasure-map/](https://46yxb83hlyy77jig73dh02ok-wpengine.netdna-ssl.com/wp-content/uploads/2015/08/safe-story-2-compressor.jpg "Buried Safe")
![Check out The Buried Treasure this Couple Found is UNBELEIVABLE!!! [NEWS] at https://homesteading.com/news-buried-safe-treasure-map/](https://46yxb83hlyy77jig73dh02ok-wpengine.netdna-ssl.com/wp-content/uploads/2015/08/safe-story-4-compressor.jpg "hidden treasure map arizona 2015")
![Check out The Buried Treasure this Couple Found is UNBELEIVABLE!!! [NEWS] at https://homesteading.com/news-buried-safe-treasure-map/](https://46yxb83hlyy77jig73dh02ok-wpengine.netdna-ssl.com/wp-content/uploads/2015/08/safe-story-5-compressor.jpg "Secret Treasure")


