How to Dehydrate Food for Emergencies See more on: http://www.totalsurvival.net/
This post may contain affiliate links. If you make a purchase, I'll earn a small fee at no extra cost to you.*


Food preservation is one of the most important skills you can have. It helps you save money and eat more healthy local food. You can also use it to stock up on food for emergencies, survival scenarios, or just hard times. If you’ve decided to preserve your own food, you might be having trouble deciding which methods to use. Before we get into specific methods, let’s talk about the benefits of dehydrating food.
Why Dehydrate Food
Dehydration is actually one of the oldest methods of food preservation. It was used by many different cultures as a way to put up their harvest long before canning jars or freezers were even invented. Today it remains one of the best methods, and for several reasons:
1. You can dehydrate and store food without using any electricity or fuel. Unlike frozen food, you don’t need to worry about a power outage ruining all your hard work. Dehydrated food in airtight containers can last for years. You don’t even need energy to dry it. (A couple of energy-free drying methods are discussed below.)
2. Dehydration requires less work. Sure, you still have to process your food, but once you’ve got it laid out in your dehydrator, you can walk away and work on something else. There’s no sitting around watching a pressure canner or blanching vegetables for the freezer.
3. Dehydrated food doesn’t need any additives. Sometimes when canning or preserving food another way, you need to add lots of salt, sugar, vinegar, or other ingredients in order to help preserve the food or help keep its color and texture. Dehydrated food, on the other hand, can be as simple as slicing something up before it’s dried.
Dehydrating food is simple and efficient. It’s great for anyone looking to grow, preserve, and use more local food. And it’s especially great for campers, backpackers, and people who want to prepare for disasters. Now we’ll take a look at some various ways to dehydrate food.
Dehydrating Methods
Electric Dehydrator
The most common method of dehydrating food is with an electric dehydrator. These dehydrators are readily available and come with a wide variety of options, and price tags. If you’re unsure if you’ll enjoy dehydrating food, you may want to start with a small, budget-friendly dehydrator before investing in a larger model.
Many dehydrators have temperature settings that make it super easy for beginners. For example, a low temperature labeled “herbs” and a high temperature labeled “meat”.
This dehydrator is super affordable, has temperature adjustments, and would be a great option for someone looking to try dehydrating for the first time.
This large dehydrator is a great option for those who plan on using it a lot. It has plenty of room, a timer, and heat adjustments.
Solar Dehydrator
Another great option is a solar dehydrator. While they aren’t readily available for purchase like the electric models, they are quite easy to make yourself. There are many free plans available on the internet and the supplies are quite affordable.
Here’s a cool Youtube video of a solar dehydrator being built.
Air Drying
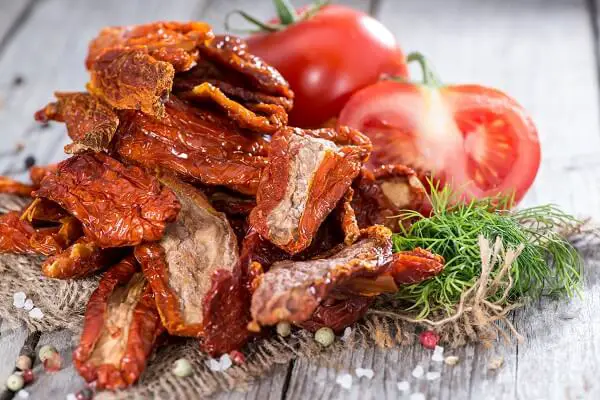
With some foods, or if you live someone where with low humidity, it may be possible air dry your food. In the desert southwest, it’s possible to dry jerky and other foods on simple screens. This method is where true sun-dried tomatoes come from.
Despite living with higher humidity, people of the Appalachians traditionally air dried green beans by threading them onto a long string to be hung until winter use. These strings of beans are often referred to as leather britches.
Many herbs and greens air dry readily when hung up or spread on a screen. If you choose to hang them, it should be noted that some herbs should be hung in a brown paper or cloth bag because some pieces may fall as they dry.
If you choose this method but need to keep insects off your food there are drying nets available.
Use a Free Heat Source
Some people hang nets or set up screens over their wood stove or heater. With this method, you’ll want to make sure it’s not so close to the heat source that the food cooks instead of drying. It may be wise to put a thermometer on your drying rack so you can keep track of the temperature.
You can even dry food in your car during the summer. Just like with a wood stove or heater, you don’t want it to get too hot, so you may want to place a thermometer near the food and open car windows if necessary.
Oven Drying
This is a great option if you’re not ready to purchase a dehydrator but still want to try dehydrating some food. (It’s also great if your dehydrator is broken.)
Here’s what you’ll need:
- An oven that can stay under 200 degrees F (most have a “Warm” setting).
- A small fan to help with air circulation.
- Vinyl gloves so you don’t get germs on the food.
- Knives for chopping up your food.
- Lemon juice to pre-treat fruits.
- A large pot so you can blanch your food first.
- Pans or cookie sheets.
Here’s what you do:
1. Put on your gloves and sort, wash, and slice up your food. Be sure to cut off any “bad spots” and remove seeds and cores. Make sure the inner parts of the fruits are exposed to air.
2. Blanch your vegetables. This is the process of boiling foods then cooling them in ice water. This helps preserve the taste and texture. Most foods only need to be boiled for a few minutes. They’re done when they’re tender but still just barely cooked. For blanching times, see the chart below.
3. Leave the veggies in the ice water until they’re no longer warm, then spread them out in a single layer on a pan or cookie sheet.
4. Fruits need to be pre-treated if you want to keep the color and flavor. Instead of blanching them, simply dip them in a mixture of lemon juice and water for no more than a minute before putting them on the cookie sheet. This process is known as dipping and is labeled “dip” in the chart below.
5. Put your food in the oven. Ideally, you want a temperature hot enough to dry the food but not so hot it will cook it. 140 degrees F is about right. However, most ovens don’t have a setting that low, so you’ll have to use the “Warm” setting.
6. Keep the door open several inches and have a fan blowing toward the oven to help circulate the air. See the chart below for drying times.
Blanching and drying times:
FoodApple
Apricots
Bananas
Carrots
Cherries
Corn
Figs
Garlic
Grapes (seedless)
Mushrooms
Okra
Onions
Peaches
Pears
Peas
Peppers
Pineapples
Potatoes
Pumpkin Blanching (minutes)
Dip
Dip
Dip
3 – 4
Dip
Not necessary
Not necessary
Not necessary
Not necessary
Not necessary
Not necessary
Not necessary
Dip
Dip
2
Not necessary
Not necessary
5 – 6
1 Drying (hours)
6 – 12
24 – 36
8 – 10
3.5 – 5
24 – 36
6 – 8
6 – 12
6 – 8
12 – 20
8 – 10
8 – 10
3 – 6
36 – 48
24 – 36
8 – 10
2.5 – 5
24 – 36
8 – 12
10 – 16
Foods You Can Dehydrate
Vegetables

Here are some of my favorite vegetables to dehydrate:
• Corn – Drying corn is simply a matter of cutting it off the cob, much easier than other preservation methods. It’s also perfect for tossing into soups and chowders throughout the winter.
• Garlic – While garlic stores well for quite a while as is, it can also be nice to dry some and make garlic powder which makes it very easy to add garlic flavor to meals. You’ll also want to dry it for longterm storage.
• Greens – Surprisingly, dehydration is a great way to put up greens. Thicker greens like nettles, chard, and spinach can be dried and added to soups and other dishes. You can even dehydrate greens like lettuce that would otherwise go to waste if not used fresh. They’re easily blended into smoothies for some extra nutrients.
• Onions – Like garlic, onions also store well fresh but can be turned into onion powder if desired.
• Peppers – Sweet peppers can be dried for use in meals and paprika, chili, and many hot peppers are perfect for drying and powdering for homemade seasoning.
• Tomatoes – Dried tomatoes are an amazing way to capture some of your harvest at its finest. Slice thinly and toss with some herbs and salt before drying. They can then be added to salads, pizza, pasta, and other meals.
• Zucchini & Summer Squash – If you grow your own, you know that dealing with a zucchini and summer squash harvest can be a challenge. Drying them is one way to combat the wheelbarrow loads that come in from the garden each summer.
Herbs

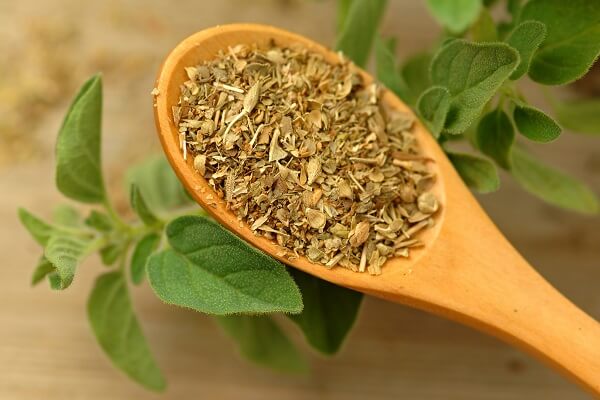
Dehydrating your own herbs is an excellent way to save some money as they can be quite pricey in the grocery store but relatively easy to grow at home. Both culinary and medicinal herbs are super easy to dehydrate and can provide you with spices and teas for your food storage.
Many herbs can simply be hung to dry. However, if your home is particularly humid, dusty, or you just want to put them up quickly, placing them in a single layer in a dehydrator is a great option. Here are some of my favorite herbs to dehydrate:
• Basil – If you cook from scratch, odds are you use a good bit of basil each year. Drying your own will save you money and it will make your food more flavorful.
• Lemon Balm – Dried lemon balm makes wonderful relaxing tea and is great for adding to seafood dishes.
• Mint – Mint is easy to grow, easy to dry, and makes an excellent soothing tea.
• Oregano – Oregano is an excellent spice to have on hand and even more delicious when dried at home.
• Parsley – It’s super easy to grow and dry!
• Thyme – Thyme is actually a perennial in many areas, so if you’ve planted it, you’ll have some you can dry for winter use for years to come.
Fruit


Even if you don’t have an orchard, it can still be very economical to put up abundant fresh fruit while it’s in season. Fresh, organic fruit can often be purchased at pick-your-own orchards or in bulk at your local farmers market for excellent prices.
Drying it can help you turn that abundance into healthy treats and ingredients for the offseason or emergency food storage. Here are some of my favorite fruits to dehydrate:
• Apples – Chopped, dried apples with oatmeal, cinnamon, and brown sugar make an excellent winter breakfast.
• Bananas – Banana chips are easy to make and an excellent snack.
• Peaches – Dried peaches make a sweet and tasty snack.
• Pears – Thinly sliced pears can easily be dehydrated.
• Plums – If you have a plum tree or they’re available at your farmers market, drying can be a great way to save some for later.
• Raspberries, Blueberries, & Blackberries – Small berries are probably the easiest thing to dehydrate as they don’t need any special preparation before you start dehydrating them. They make tasty additions to cereal, granola, and trail mixes.
• Strawberries – Like many fruits, strawberries are in sweeter when dried. Slice them and place them in your dehydrator for some all-natural candy.
• Watermelon – There’s no way to put up watermelon besides dehydrating! Cutting it into thin strips and drying it will give you what many people call “watermelon candy” or “watermelon jerky.” It’s super flavorful and kids love it.
• Grapes – Many families eat raisins, but few make their own. They’re a great snack and surprisingly easy to make at home.
Mushrooms
If you forage or grow mushrooms, dehydrating is a great way to put up any surplus. They’re also perfect for adding to dehydrated meals. Many mushrooms are great for dehydrating, including cultivated varieties like portobellos and shiitakes, wild types like chicken of the woods and chanterelles, and even medicinal mushrooms like reishi or turkey tail.
Meals
Whether you’re an avid backpacker, homestead prepper, or just like convenient meals and ingredients, drying food might be a great option. These foods are fairly easy to dehydrate and, along with some other ingredients, can make a great meal.
• Meat – Meat can safely be dried for use in meals. With most meats, it’s best to cook it first. Just make sure it’s “bone dry” when you go to store it.
• Potatoes – Just like with rice, your homemade mashed potatoes can easily be turned into instant potatoes. They’re excellent for longterm emergency food storage.
• Refried Beans – Refried beans can also be made and then dried to create instant beans. They’re a wonderful and quick protein source for a meal on the trail or in a survival situation.
• Rice – If you’re a backpacker, prepper, or simply want some quick meals, it’s easy to make your own instant rice. Just partially cook it and then re-dry it in your dehydrator.
• Spaghetti Sauce – It seems odd, but spaghetti sauce can be spread into a thin layer and dried to be rehydrated later with a box of pasta.
• Stir Fry – Paired with some spices, a mix of dried vegetables and rice can make an excellent stir fry in an emergency or at a family campout.
The Backpacking Chef has tons of great information about dehydrating complete meals.
Snacks
Dehydrating your own snacks can be a great way to add nutritious, morale-boosting foods to your food storage for little cost. In everyday life, they’re also a great alternative to many of the processed snack foods available at grocery stores today. For families, they can provide children with cheap, healthy, and tasty snacks.
• Fruit Leathers – Fruit leathers are always a big hit, especially if you have kids. All you need to do is make a fruit puree and spread it in a thin layer on a dehydrator sheet. When it’s dry, slice it into strips and roll it up with wax paper.
• Pemmican – Some consider pemmican the ultimate survival food and it’s pretty simple to make. It’s just a combination of equal parts dried meat and rendered fat. Dried berries can be added if available as well. In a survival situation or even just while hiking, it’s a great, lightweight, filling, and highly nutritious option.
• Jerky – Many people love jerky but store-bought jerky is full of chemicals. Making your own jerky is great for homesteaders, hunters, or those simply looking for a healthier option.
• Hummus – An excellent vegetarian, protein-filled snack to have for the trail or your food storage, hummus can be spread in a thin layer and dried.
Related Post: 7 Foods You Should NOT Dehydrate
Dehydrating Tips
• For long-term storage, make sure anything you dehydrate is truly dry. For many foods, this means they should break when you bend them.
• In order to utilize your dehydrated food, you may want to do some meal planning. While some dehydrated foods rehydrate very quickly, others take a bit of time, so you won’t necessarily have an instant meal. Remembering to soak or prep certain ingredients can be a challenge if you’re not used to it.
• If you’re going to dehydrate more liquid foods like spaghetti sauce or fruit leathers, you should find a dehydrator that offers reusable sheets for its racks rather than just the screens.
• The lower the temperature you dehydrate your food at, the more nutrients it will retain.
Related Post: 13 Things You Should Know Before Dehydrating Food
How to Store Your Dehydrated Food
Dehydrated food is some of the easiest food to store long term as it takes up a relatively small space and requires no electricity. All you need to keep your dehydrated food good is to pack them in airtight containers and keep them in a dark place like a cabinet or cellar.
Good options for containers include:
- Air Tight Tupperware – If you have extra Tupperware on hand, it will work for food storage so long as it’s airtight. You can use glass or plastic.
- Canning Jars – These are an excellent option for anyone who wants to avoid plastic. They’re also reusable year after year which is great for the environment and your wallet. Plus because so many people can and they’re easy to sterilize you can pick them up cheaply yard sales and second-hand stores.
- Freezer bags – Probably the cheapest method, freezer bags are a great option, especially if you’re just getting started.
- Vacuum Bags – If you have a vacuum sealer, using vacuum bags can be an excellent option for keeping food good longterm and making sure your foods are nice and compact, helping make the most of your storage space.
- Mylar Bags with Oxygen Absorbers – Another longterm storage option is mylar bags with oxygen absorbers. With this method, you’ll want to make sure the quantity of food in each bag can be used in a reasonable amount of time or it will need to be repackaged.
- Food Grade 5 Gallon Buckets & Gamma Seal Lids – If you want to store large quantities of food for a long time, food grade buckets with gamma seal lids are a great option. They hold tons of food and lock out any moisture and air. You can also add oxygen absorbers to increase your food’s shelf life.
It should be noted that solid containers are best for keeping more delicate foods from being crushed or powdered during storage. You can also pack bags of food into a larger container like a five-gallon bucket.
If you notice moisture inside a container, remove your food and re-dry and repackage it. Any food with signs of spoilage like mold or odd smells should be discarded. Clear containers are excellent for beginners because they allow you to keep an eye on your food until you’re sure you’ve got the hang of things.
Dehydrating your food is a safe and easy way to preserve food at home. You can get started right away with little or no financial investment. Whether you’re a prepper, homesteader, hiker, or combination of all three, knowing how to dehydrate food is a great tool to have in your skill set. It will help you add more healthy local food to your diet, create lightweight, quick meals, and prepare for emergencies.
For detailed instructions on how to dehydrate specific foods, I highly recommend getting The Ultimate Dehydrator Cookbook by Tammy Gangloff. It has recipes for virtually every food that can be dehydrated.
 This article first appeared on urbansurvivalsite.com See it here
Check Out The Post Here: How to Dehydrate Food for Emergencies
No comments:
Post a Comment